![]()
 |
 |
Working on the new Corvette
Part 2: Computer diagnostics, driveline fluid checks, brakes and performance enhancements.
by Hib Halverson
Part One of this series dealt with jacking and maintenance of the LS1 engine. This month, we close out our look at do-it-yourself maintenance of C5 with a discussion of basic engine controls diagnosis, transmission and rear axle maintenance, brake items and a few DIY performance tidbits.
Diagnostic Basics
The ability to view engine-operating data, such as oil pressure and coolant temperature, in digital form on the instrument panel has been a feature of Corvettes since 1984. Starting in model year 1992 (MY92), the C4 IP would even display limited diagnostic data relating to the car's on-board computer systems.
 C5's capacity to do that is significantly expanded. The new car has 11 computer
"modules" that transmit diagnostics: Powertrain Control Module (PCM),Traction
Control System (TCS, which combines traction control, ABS and, on cars built after
12/15/97, the optional Active Handling System), Real Time Damping (RTD), Body Control
Module (BCM), Instrument Panel Cluster (IPC), radio, heating-ventilation-air conditioning
(HVAC), Left Door Control Module (LDCM), Right Door Control Module (RDCM), Seat Control
Module (SCM) and Remote Function Actuation (RFA).
C5's capacity to do that is significantly expanded. The new car has 11 computer
"modules" that transmit diagnostics: Powertrain Control Module (PCM),Traction
Control System (TCS, which combines traction control, ABS and, on cars built after
12/15/97, the optional Active Handling System), Real Time Damping (RTD), Body Control
Module (BCM), Instrument Panel Cluster (IPC), radio, heating-ventilation-air conditioning
(HVAC), Left Door Control Module (LDCM), Right Door Control Module (RDCM), Seat Control
Module (SCM) and Remote Function Actuation (RFA).
The IPC display, the 20-character, vacuum-fluorescent screen above the steering column that says "Corvette by Chevrolet" every time you start the car, is a powerful device. Its primary function is to display warning and status messages from the modules. For cars built before 12/15/97, there are 48 of these warning/status messages. A few additional messages come from cars built after that date and equipped with the Active Handling option. A list of the warning/status messages can be found in your Owner's Manual or in the Service Manual for your model year.
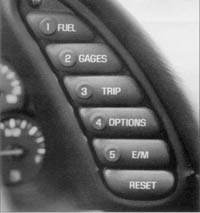
The IPC can display powertrain operating information and tire pressures by simply pressing different buttons on the Driver Information Center (DIC) to the right of the instrument panel. In addition, using the "options" button, you can configure the C5's keyless entry and security systems. Use of the IPC and DIC for these purposes is discussed in your Owner's Manual
DIY Service Techs will be most interested in the IPC's display of diagnostic trouble codes (DTC) for all modules that transmit them. The "diagnostic display" mode is entered with the following procedure: 1) turn on the ignition but don't start the engine. 2) press the "reset" button to turn off any warning messages 2) press and hold "options" and 4) while holding "options", press "fuel" four times within a 10-second period.
Initially, on-board diagnostics go into "automatic" mode which shows DTCs in a pre-set sequence: PCM-TCS-RTD-BCM-IPC-radio-HVAC-LDCM-RDCM-SCM-RFA. For each module, all DTCs will be displayed. If none are present in a module, you will see "no more codes" on the ICP display.
There are two kinds of DTCs, "current" and "history," designated with a letter suffix, "C" or "H". A current code indicates a malfunction is present in the system whose module is displaying data. A history code indicates a problem existed sometime in the last 40 or 50 ignition cycles. When not accompanied by a current code of the same number, it's possible evidence of a previous problem, now solved, that was not removed by clearing codes. More likely it indicates an intermittent malfunction.
"Intermittents" are the most challenging DTCs. An intermittent may have happened once, may have happened more than once but is inconsistent in its appearance or may be happening on a regular basis but not at the time the IPC is displaying codes. History codes can also be caused by a current malfunction in a system that is not operating at the time DTCs are displayed. An example is the rear window defogger which doesn't operate until the BCM detects engine rpm. For history codes set by a system that does not operate with the key on and engine off, a special diagnostic tool called a "scan tester" is necessary to properly diagnose the malfunction.
Once the IPC has displayed all modules, the system goes into the manual mode which allows selection of each module using combinations of DIC buttons. Manual mode can also be entered during the automatic sequence by pressing any button except "E/M". Once the IPC displays "manual diagnostics," select a module by pressing the "options" button to go forward or the "trip" button to go back. Once a system is selected and a DTC is displayed, if more than one are present; press "gages" to go forward or "fuel" to go back.
To exit the diagnostic mode at any time, press "E/M". If you want to erase or "clear" codes, press "reset." Clearing a code does not repair a problem. You are simply erasing the evidence of it in the module's memory.
Once you have DTCs, the next question is: What to do with the information? First, consult the factory service manual. Any serious C5 DIY should invest in the Corvette Service Manual of the appropriate model year. Unfortunately, it is an expensive set of three books totaling (1997 edition) 3890 pages and stacking 4 1/4 inches high. In spite of its cost and size, the Service Manual is a requirement if you want to understand and work on your C5. They are available through Chevrolet dealers and mail order sources, such as Ecklers and Mid America.
Using one of the C5s we used to prepare this series, we simulated a fault in the #1 throttle position sensor (TPS) by disconnecting it while the engine was running. This enabled the "reduced power mode", turned on the malfunction indicator light (MIL), set DTC P1120 and caused the IPC to display "service vehicle soon."
Turn to Section 6: Engine Controls in the Service Manual and look up the DTC in question. Read the preliminaries, including the diagnostic aids and take the actions they suggest, then, move to Step One of the diagnostic procedures. Of course, after we were done with our photos, we simply reconnected the TPS harness and cleared codes. Few DTC situations are as simple as that.
The diagnostics for some DTCs call for a scan tester. Also known as "scan tools" or "scanners," these units are really hand-held diagnostic computers. A little larger than a portable cassette recorder, powered by the car battery and connecting to the diagnostic link connector (DLC); they "scan" computer module data and display it on a small screen. Scan testers are operated by a small keypad. Software is usually in plug-in cartridges covering a specific model year.
Where you might get stuck needing one of these pieces of equipment is when the Service Manual calls for operating a specific system with a scan tester for test purposes or reading a module's "freeze-frame" or "failure records". If you are trying to solve a DTC, determine that a scan tester is required but don't have access to one; take the car to a service facility for repairs.
Scan testers that work with C5s are expensive devices, perhaps out of reach of many
DIYs; however, those with substantial test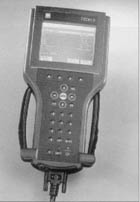 equipment budgets may want to purchase
one. At press time, the amount of testers available that support C5 was limited. The GM
Service Technologies Group's TECH2, a required tool for GM dealers, is available from Mac
Tools, OTC and some other sources. Additionally, OTCs own "Monitor 4000
Enhanced" is also available with software that supports the '97 Corvette.
equipment budgets may want to purchase
one. At press time, the amount of testers available that support C5 was limited. The GM
Service Technologies Group's TECH2, a required tool for GM dealers, is available from Mac
Tools, OTC and some other sources. Additionally, OTCs own "Monitor 4000
Enhanced" is also available with software that supports the '97 Corvette.
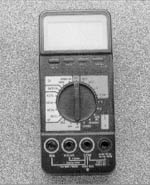 The good news is some DTCs are solvable without a scan
tester. In fact, our example, P1120, can probably be solved using only a common piece of
test equipment, a digital multimeter (DMM). In many cases, the Service Manual calls for
the "DMM, J39200", marketed by GM's factory service tool supplier, Kent-Moore,
however, most any DMM with at least 10-megohm input impedance can be used. Examples are:
the, high-end, Mac Tools ET332 and the value-packed, Sun-Pro CP7680. The Mac is an
outstanding piece of equipment which, because of its versatility, is the DMM of choice for
the Vette Magazine technical staff. The Sun-Pro includes the some of the primary features
of the Mac unit along with something the Mac does not: the ability to measure
temperatures. It's a great choice for the cost-conscious, DIY service tech.
The good news is some DTCs are solvable without a scan
tester. In fact, our example, P1120, can probably be solved using only a common piece of
test equipment, a digital multimeter (DMM). In many cases, the Service Manual calls for
the "DMM, J39200", marketed by GM's factory service tool supplier, Kent-Moore,
however, most any DMM with at least 10-megohm input impedance can be used. Examples are:
the, high-end, Mac Tools ET332 and the value-packed, Sun-Pro CP7680. The Mac is an
outstanding piece of equipment which, because of its versatility, is the DMM of choice for
the Vette Magazine technical staff. The Sun-Pro includes the some of the primary features
of the Mac unit along with something the Mac does not: the ability to measure
temperatures. It's a great choice for the cost-conscious, DIY service tech.
A '98 Corvette has over 125 different DTCs for the PCM, alone. Obviously, it is unrealistic for a magazine article to discuss which codes can be solved without a scan tester. The more experienced you are at DIY diagnostics, the easier it will be to read the service manual and decide. For example, anytime you see a reference to a scan tester being used to read a voltage, you can almost always substitute a DMM. Anytime you are instructed to use the scan tester to read DTCs, you often can do that with the IPC display in the diagnostic mode. If you are instructed use the tester to clear codes, you often can do that with the IPC display in diagnostic mode by pressing the "reset" button on the DIC.
Transmissions and Rear Axle
The GM Hydra-matic Division's, 4L60-E automatic transmission is base equipment on C5
and comes in a version used only on that platform. Not only is it specific to the rear
transmission layout, but it's beefed-up over C4 4L60-Es with a more robust torque
converter, a new fluid pan for more consistent fluid pressure during high lateral
acceleration and revised calibration. Wide-open-throttle shifts now occur at 6000 rpm.
Shifts are quicker and shift timing is tightened up. To improve durability, transmission
controls include torque management, which retards timing for a fraction of a second during
WOT shifts to reduce shock loads.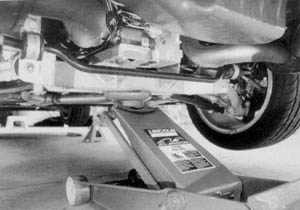
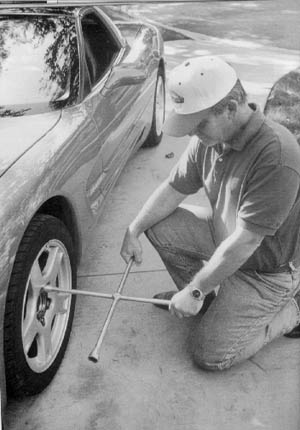
One difference between C5 and C1-4 is found when checking the automatic transmission fluid (ATF) level. There is no dipstick. Fluid checks are accomplished while working under the car with the engine running. This may involve hot fluid, powertrain and exhaust parts so we suggest wearing a pair of the Mechanix Brand gloves we talked about in Part One or an equivalent to protect your hands.
Support the car on stands or lift it with a hoist. If you did not read the jacking instructions in Part One of this series; before jacking the car, review them or read the jacking instructions in the Corvette Service Manual. Some jacking points acceptable with other vehicles you may have worked on, if used on a C5, will damage the car.
If you are going to check the trans with the car on stands, make sure it is high enough for you to safely move and work while the exhaust system is at operating temperature. Start the engine and, using the "gauges" button on the driver information center (DIC), put transmission temperature on the IPC display. Run the engine until the trans temp is between 86o and 122oF. Apply the brakes and shift into each gear for a few seconds, then shift back to park.
Set the parking brake, leave the engine running and crawl under the car. Position a drain pan under the fill plug area and remove the plug. If fluid dribbles out or is right at the bottom of the fill hole, your transmission is full. If fluid leaks profusely, it was overfull and you should allow the excess ATF to drain into the pan. If no fluid comes out you will add more in a minute.
Inspect the fluid color. If necessary use a small screw driver or a hex key as a dip stick. Red or red with a light-brownish tinge is the normal color. If the fluid has a medium-to-dark brown color or smells burnt, change the fluid and filter. If the fluid has a cloudy or milky appearance, it's contaminated with coolant. The solution to that is beyond the scope of an article on basic maintenance. See the Service Manual for further information.
 If you need more fluid, add enough to bring the level
up even with the bottom of the fill plug hole, replace the transmission fluid fill plug
and shut off the engine. Your fluid check is complete. If a large addition of fluid was
required, there is a leak somewhere that needs to be repaired. If the leak is not obvious,
see the Service Manual for information on leak detection. Admittedly, checking the C5 ATF
can be an awkward, messy operation. Before you do it, get the car up in the air and
visualize the procedure.
If you need more fluid, add enough to bring the level
up even with the bottom of the fill plug hole, replace the transmission fluid fill plug
and shut off the engine. Your fluid check is complete. If a large addition of fluid was
required, there is a leak somewhere that needs to be repaired. If the leak is not obvious,
see the Service Manual for information on leak detection. Admittedly, checking the C5 ATF
can be an awkward, messy operation. Before you do it, get the car up in the air and
visualize the procedure.
General Motors aggressively sells reduced and, even, no maintenance of certain systems on its cars. While conceptually, reduced/no maintenance may appeal to those at Chevrolet responsible for marketing America's Sport Car; we remain unconvinced that some of the advertised maintenance intervals are appropriate when maximum durability of a high-performance car is desired.
Corvette is said to have a 100,000 mile, ATF and filter change interval, however, there is an exception to that, noted in the Service Manual. If your C5 is: regularly operated in heavy traffic when the ambient temperature is above 90oF (temperature near the road surface on just a warm day may reach that), operated in hilly or mountainous areas or operated in a high-performance duty cycle, the fluid/filter change interval drops to 50,000 miles. Seems to us that the "normal" duty cycles of many C5s precludes the 100,000 mile change interval. So much for marketing, eh?
The Technical Staff at Vette fells that 50,000 miles should be the maximum mileage between trans fluid and filter changes for the majority of fifth generation Corvettes. If you run your automatic car hard, such as autocrosses or drag racing in the hot summer, we suggest doing it at 35,000 miles or as soon as possible after a fluid check that shows the ATF turning brown.
Even though we suggest a trans fluid/filter change at half-to-a-third the advertised interval, that is still more than twice what GM recommended for C4s operated under any of the three conditions listed above. How can that be, considering the basic transmission and the fluid are the same? Simple. From a transmission cooling standpoint, C5 is a better car than was C4. The enemy of any automatic trans is high fluid temperatures. If peak fluid temps are reduced, fluid life increases.
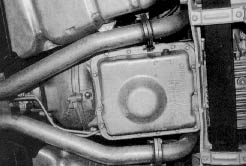
Changing ATF in a C5 is no more difficult that it's been in Corvettes of the past. Support the car safely, place a drain pan under the transmission and remove the fill plug. With the engine not running, the trans pump is not circulating fluid so there will be significant drainage out the fill plug hole. Once that stops, support the trans pan and remove its bolts. Carefully remove the pan and drain the remaining ATF. You may need to tap the pan with a soft hammer to break it loose.
Once the pan is off, carefully inspect its bottom. There may be a silver or gray residue there. A tiny bit of residue is normal, however, a significant amount means the transmission has a problem. The definition of a "significant amount" is hard to characterize, but my instructor in an automatic transmission overhaul class I took oh, so long ago, used to say, "If you see more than a dime's worth of metal in the bottom of the pan, overhaul it." Be it a dime's worth or a significant amount, if you see that in the trans pan, put it back on, refill the trans and take the car to a transmission service facility for diagnosis and possible repair.
If there is no residue or a just tiny bit, set the pan aside. Note the position of the filter to aid in installing the new unit. Then, remove it by gripping it firmly and pulling down while twisting a bit. Discard both filter and filter seal. If the seal is stuck up in the valve body, pliers will usually pull it out. Remove all traces of the old gasket from the transmission case and pan. If a significant amount of the gasket is stuck to the pan and you have a quarter-inch-chuck, die grinder, a great way to remove it is with the Gasket Removal Kit from Standard Abrasives Motorsports Division. This kit contains abrasive discs that fit on the die grinder and will quickly remove gaskets but not harm the pan. Because of the threat of gasket and abrasive particles getting into the transmission do not use those discs to remove gasket material from the trans case. That you will have to do with a scraper.
Obtain an ACDelco trans filter kit (p/n TF306). Install its new filter seal in the valve body then push the new filter in place. Clean out the trans pan and look closely at its bolt washers. Their flat sides go towards the pan. If they are reversed, get new bolts. If they are not reversed, reuse the bolts. Apply the new gasket to the pan. Install the pan and torque the bolts to 8 ft/lbs.
Add fluid until it leaks out, then install the fill plug. Perform the fluid check procedure discussed earlier and, if necessary, add more fluid. Since 1994, the factory-fill fluid in Corvette automatics has been an organic-based ATF meeting the Dexron III specification. A suitable performance upgrade would be a switch to or Red Line Oil's D4 Synthetic ATF or Mobil 1 synthetic fluid.
Optional for fifth-gen 'Vettes is the Tremec, T56 six-speed manual transmission. It was derived from an existing gearbox used in the Camaro. GM policy is: no maintenance fluid changes for the C5 manual, however, we believe better durability in a high-performance duty cycle, particularly if the car is raced during summer months, will come with fluid changes at 35,000 miles or sooner, if the fluid begins to turn brown.
Fluid checks are accomplished with the engine off. Remove the transmission fill plug. If the level is even with the plug hole threads or fluid dribbles out, your trans is full. If fluid leaks profusely, it was overfull and you should allow the excess to leak into a drain pan. If the level is below the plug hole threads, add fluid until it's even with the threads.
To drain the fluid, remove the T56's drain plug. When the fluid stops running, replace the drain plug and refill the gearbox through the fill plug hole. Factory-fill in the T56 is Dexron III ATF. Red Line D4 Synthetic ATF is a good performance upgrade. If the car is road raced regularly, the best lubricant may be Red Line MTL. It offers better lubrication at high temperature than does automatic transmission fluid.
The C5 uses a rear drive axle assembly built by Getrag in Germany. It bolts to the back of the transmission and the trans output shaft is splinted directly to the axle's pinion. It does not share lubricant with the transmission. It uses a conventional, hypoid gear set having a 7 5/8th-in. diameter ring gear and a traditional, clutch-type, limited-slip differential. Axle ratios are: base, 2.73:1; optional for automatics, 3.15:1 and for all manuals, 3.42:1.
GM recommends no maintenance fluid changes and, again, if you run your car hard, we suggest you change your fluid every 35,000 miles. Fluid checks are accomplished by removing the axle fill plug. If the level is between the hole threads and a quarter inch below the threads, the axle is full. Replace the plug. If you are going to change the fluid, remove the axle drain plug. When the draining is done, replace the plug and fill the axle through the fill plug hole to the level discussed above. The factory-fill lubricant is mix of GM Axle Lubricant (p/n 12345977), an 80W90, petroleum-based, GL5 gear oil, and GM Axle Lubricant Friction Modifier (p/n 1052358).
Friction Modifier is required to eliminate limited slip noise or chatter and the Service Manual recommends a mix of 6.25% Friction Modifier or about 3.4 ounces of the axle's 1.7 quart, lubricant capacity. The product works by slightly altering limited slip action to reduce chatter. Obviously, for highest performance, we want all the limited slip action we can get, so a better (but admittedly more tedious) way to add Modifier is by trial and error. Fill the axle with lubricant to a quarter inch below the fill hole threads, then add two ounces of Friction Modifier. Warm the axle for ten miles then make a slow-speed, tight circle. If you feel chatter or hear a squealing noise from the rear of the car during the turn, it's probably the limited slip. Add another half-ounce of the Modifier and road test again. If the noise is still present, add another half-ounce and road test. Once you have gotten to the point of no squeal or chatter, if necessary, top off with a little more axle lubricant.
Generally, it will take 2.5-4 oz. of Friction Modifier to solve most noise problems. If you get to 4.5 ounces and the noise persists, there may be a problem with the axle and you need to take the car to the dealer for repairs.
We feel a better axle lubricant, especially if the car is raced, is Red Line 75W80 Lightweight Synthetic Gear Oil. While there is a very slight performance increase in using a synthetic through a reduction in friction, the real advantage is a synthetic's ability to lubricate better at high temperatures. The C5 axle is packaged tightly and flanked by two hot exhaust pipes. Axle cooling, especially on hot days on the autocross or road race track is going to be at a premium. Perhaps a synthetic lubricant is a good choice. Red Line includes 6% friction modifier in their formula so addition of a modifier is usually not necessary. The only exception might be a new or near new axle converted to synthetic lubricant. In that case, a small addition of Red Line's own Friction Modifier might be necessary.
Stop to Match the Go
The first thing most people notice about the brakes on a C5 is they are beefy suckers! The calipers are robust, two-piston, aluminum press-castings. They are more rigid than any C4 caliper. The brake discs are big, vented units that are about the same diameter but slightly thicker than the ones used on '88-'96 C4s with J55 brakes. Interestingly, GM abandoned the caliper-lock type parking brake used on most C4s and has returned to the "mini drum brake" system used on Corvettes from '65 to '87.
Brake pad changes are fairly simple and must be done in axle sets, only. You siphon
about 2/3rds of the brake fluid out of the master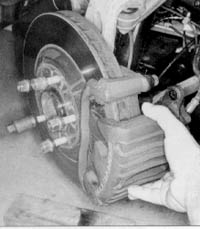 cylinder then
pull the wheels on the end of the car on which you will change the brakes. Use an ordinary
C-clamp to retract the brake pistons enough to remove the caliper. Make sure the one end
of the clamp rests on the inlet fitting bolt on the inside of the caliper and the other
end against the outboard brake pad. After retracting the pistons, remove the caliper guide
pin bolts, remove the caliper from the mounting bracket and, finally, remove the brake
pads.
cylinder then
pull the wheels on the end of the car on which you will change the brakes. Use an ordinary
C-clamp to retract the brake pistons enough to remove the caliper. Make sure the one end
of the clamp rests on the inlet fitting bolt on the inside of the caliper and the other
end against the outboard brake pad. After retracting the pistons, remove the caliper guide
pin bolts, remove the caliper from the mounting bracket and, finally, remove the brake
pads.
Install the outside pad with the insulator to the outside or toward the caliper housing. Install the inside pad with the wear sensor toward the pistons and such that the sensor is in the trailing position during forward wheel rotation. Reinstall the caliper, reinstall the caliper pin bolts and torque them to 23 lb/ft.
Put the wheels back on and torque the lugs, in star pattern and in 25 ft/lb. increments, to 100 lb/ft. Refill the master cylinder to the proper level then pump the brakes slowly and firmly to seat the brake pads against the rotor. Bleeding after a pad change without opening up the hydraulics, is unnecessary unless the brakes are diagnosed as having air in the system.
Those feeling the need to upgrade brake pads should consider that move carefully. C5 brakes are a measure better than those on C4. Our feeling is that all street drivers and even those engaging in autocross will be ok with the stock brakes. If you still want more aggressive pads, the aftermarket will have them in time, but expect dirty wheels from brake dust and, perhaps even degraded cold brake performance and increased brake rotor wear.
Brake complaints are sometimes based on the feeling that the rotors have lateral runout. While those situations can occur, our suggestion is, before you spend money on machining or replacing rotors, read the Service Manual in re: brake disc runout.
Brake bleeding using the manual method is accomplished in the same manner as it has for many years on Corvettes. If the master cylinder is suspected of having air in the bore, it must be bled first. Only after that should you do the calipers. The sequence of bleeding calipers is RR-LR-RF-LF. During brake pedal stroking remember to stroke the pedal only once and hold. Do not stroke rapidly and do not pump it repeatedly. Rapid pumping of the brake pedal pushes the secondary master cylinder piston down the bore in a manner that makes bleeding difficult. Pause 15 seconds after releasing the pedal, then begin the next stroke. Generally, each caliper should be pumped and bled 10 times. Obviously, manual bleeding requires an assistant and make sure to leave the windows down to facilitate communication between "stroker" and "bleeder".
C5 brakes can also be pressure bled, if you have the proper equipment. Additional information on pressure bleeding and further details on the manual method can be found in the Service Manual. For information on brake fluid to use in a C5, see Part One of this series or the Service Manual.
if a manual and/or pressure bleed are not successful and the system is diagnosed as still containing air; the ABS/TCS modulator may need bleeding. This cannot be done manually or with pressure. There is an "autobleed" procedure that can only be performed on the system using a TECH 2 equipped with the appropriate software. If you lack a T2 and find the ABS/TCS modulator needs bleeding you will probably make a trip to the dealer.
Modify It? Well--duh!
As great a car as C5 is, work by Dave Hill's team of development engineers in some areas resulted in a car optimized for all-round performance. Take ride and handling. While the new Corvette in Z51 trim is pretty damn awesome for a production car, in a road racing or autocross environment, some adjustments can be made to further improve performance at the expense of tire wear, driving ease, wet traction, ride quality and interior noise.
Back in the C4 years, there were occasional "disagreements" between development engineers and the assembly plant over ride height. I remember Scott Allman, (former Lead Ride and Handling Engineer and now an engineer at Harley-Davidson) telling me they sometimes could not get the plant to build the cars with the trim height they wanted. Sometimes, cars were too high, too low and even high on one end and low on the other.
That problem was addressed with the C5's improved suspension design. If you look real close, you will see each spring has jack screws or "spring adjuster bolts" at its ends which offer some adjustment for ride height. At this point, we have not actually lowered a C5 this way, but our careful reading of the Service Manual along with talking to some engineers, has us believing the adjustment range to be about one-inch.
 If you regularly autocross or road race your C5 and are intent upon altering
its suspension for increased handling performance, understand one thing first: our
suggestions are for the FE3 performance suspension included in the Z51 option. It has the
spring and stabilizer bar rates appropriate for motorsports use. Our suggestions do not
apply to the base or F45 (RTD) cars with the FE1 suspension. Those cars do not have spring
rates high enough to keep the suspension from bottoming once the car is lowered. Secondly,
understand that the modifications we suggest are mainly for race track use. On a street
car, the changes will cause an increase in tire wear, decreases in driving ease, wet
traction and ride quality along with an increase in interior noise.
If you regularly autocross or road race your C5 and are intent upon altering
its suspension for increased handling performance, understand one thing first: our
suggestions are for the FE3 performance suspension included in the Z51 option. It has the
spring and stabilizer bar rates appropriate for motorsports use. Our suggestions do not
apply to the base or F45 (RTD) cars with the FE1 suspension. Those cars do not have spring
rates high enough to keep the suspension from bottoming once the car is lowered. Secondly,
understand that the modifications we suggest are mainly for race track use. On a street
car, the changes will cause an increase in tire wear, decreases in driving ease, wet
traction and ride quality along with an increase in interior noise.
While the largest performance increase will come from an alignment change, the first place to go would be ride height because, after a ride height change, front end alignment is required and there is no point doing it twice. Adjust the jack screws mentioned above per instructions in Section 3 of the Service Manual to the lowest spring adjuster bolt gap allowed in the "General Specifications" tables for front and rear suspensions. Generally, you multiply a screw adjustment change by 1.5 to get the approximate change in trim height. We do not recommend lowering the car more than 0.75-1.00-in. because, in the rear, much more than that will have the car hitting the bump stops on compression. Once that happens the rear wheel rate goes way up and the car will oversteer excessively. After the ride height is set, have the car aligned.
C5 suspension engineers must have had motorsports enthusiasts in mind because the car's alignment range allows a chassis set-up appropriate for racing. If, in the interest of being competitive, you're willing to accept the compromises in tire wear and drivability an aggressive alignment brings, we suggest resetting camber to -1.0o at all four wheels, a conservative starting point. We've also heard from some who understand the new car's chassis that a better way to go for competition is to simply set the camber adjusters for the maximum negative camber setting that still has both sides equal and no more than a 0.25o-0.50o spread front-to-rear. For example: if you can set the left front for -1.75o and the right front for -1.5,o then set both fronts at -1.5o and the both rears at -1.5o to -1.0o.
The only exception to the rule on front-to-rear camber spread might be a very aggressive autocross application where you set the maximum possible camber at both ends then balance the larger front-to-rear spread with a stabilizer bar change. In the front, C5 gives those in search of aggressive front end alignment a source of camber adjustment other than the normal adjusters on the lower control arms. The front upper arms on most cars will have shims between the control arm shafts and the hydroformed frame rails. Removing those shims allows even more negative camber. Those running in SCCA autocross classes that limit alignment to the service adjustment range will find this feature highly desirable.
A basic ride and handling enhancement is larger diameter stabilizer bars. Bigger bars increase roll stiffness and the advantages of that are well-known to autocrossers and road racers. One aftermarket company that should be to market with larger bars by the time you read this is Hotchkis Performance.
Tires are also an integral part of the motorsports equation. Production C5s use 18-inch rear wheels. Currently, there is not a lot of tires suitable for hardcore competition use in 18-inch sizes. Right now, C5ers looking for sticky tires are using OE or aftermarket C4 wheels mounted with Goodyear GS-CS, Goodrich Comp T/A R1, Yokohama A302R, Kumho Victoracer or similar products. We have tested none of these and, thus, have no opinion, as to what tires to use but agree that the 17-in. configuration is the way to go until appropriate 18s are available.
One way to get some good intel on tires is to hang out at championship autocrosses and see what tires are on Corvettes turning the quickest times. Out west, we understand that noted C4 autocrossers, Scotty and LiNay White and Rita Wilsey use Kumho tires.
We suspect that a lowered C5 Z51, fitted with bigger stab bars, soft-compound tires and an aggressive alignment would be pretty competitive in autocrossing and a blast to drive on a race track. Nevertheless, we offer this caution: all of these suspension modifications are for cars that are raced regularly. Setting up a C5 that is often street-driven with more than a slight change in ride height or alignment will result in poor tire wear characteristics, inconsistent steering effort induced by trough wander, a level of head-toss caused by high roll stiffness that might be uncomfortable and a reduction in handing performance on wet roads. Understand the modifications but know the consequences of them, as well.
C5ers wanting something more complex to satisfy their need for altered handling should look to Doug Rippie Motorsports. DRM has a coil-over-shock conversion kit available for the new cars that offers the same benefits as does its similar system for C4s. The most attractive feature of a coil-over-shock conversion is its adjustability in motorsports applications. Of course, adjustability is a doubled-edge sword--one also must have race track test data and considerable knowledge of suspension to properly use a coil-over kit's features. Additionally, DRM has revalved, Sachs shock absorbers for non-coil-over applications along with a brake upgrade that includes larger front rotors and new mounting brackets but retains the existing brake calipers.
Wheels are the most popular aftermarket accessory for Corvettes. The high-end wheel business is slowly responding to the C5. Many owners don't care for the look of the base wheel and the optional, magnesium SpeedlinesÐbecause of their Italian manufacturer's inability to meet demandÐseem to be really made of unobtainium. Those situations have fired-up interest in aftermarket wheels for the fifth-gen cars. At last fall's Specialty Equipment Market Association trade show, we saw a lot of attractive wheels on C5s, however, not all were practical for everyday street use because some do not accept the OE, tire pressure monitor (TPM) system sensors mounted inside each stock wheel. The new Corvettes all use extended mobility technology (EMT) or "run-flat" tires. With the stock, Goodyear F1-GS EMTs, the typical visual symptoms of low or no tire pressure do not occur so, we feel the TPM sensors are pretty important for any aftermarket wheel installation intended for street use.
One sharp-looking wheel is built by the famous wheel maker, BBS. Called the "LM", it's a two-piece, forged aluminum design with clear-coated rims and "Brilliant Silver" painted centers. These wheels are manufactured using computer-numeric-control (CNC) equipment. BBS LMs accept the stock tires sizes. The fronts, 9x17-in., and the rears, 10x18-in., are a half-inch wider than stock which gives the car a more aggressive appearance but does not cause a clearance problem. The wheels come with TPM sensors already installed along with instructions on how to "re-learn" the RFA module to the new sensors. The wheels weigh 20.5 and 22.8 lbs., respectively, including the pressure sensors. The BBS folks tell us the wheels are made with more clearance between the front brake calipers and the inside of the wheel allowing any weights to be hidden rather than putting on the outside of the wheel as does GM with the optional, unobtainium Speedlines.
Another great-looking C5 wheel is made by Fikse, a brand popular with C4 owners. They are available in five styles, come in 17-in. or 18-in. diameters and widths of 7-to-14-in. in 1/2-in. increments. Wheel weights are 17-20 lbs depending on width and center design. Fikses are a three-piece design having forged, 6061-T6 aluminum centers and spun aluminum rims that are CNC machined. The standard Fikse finish is clear coated, polished aluminum, however, there are other optional finish treatments. Interestingly, all Fikse wheels are individually serialized which, according to their press info, allows for: "Écertification of each component, tracking of all source materials, verification of ownership and the history of each wheel." Fikse tells us their most popular wheel for the C5 is the "MACH V". Fikse wheels will accept OE TPM sensors, however, they are not included. The customer needs to transfer an existing set of sensors to the new wheels. Re-learning the sensors is not necessary if each is returned to its original position on the car.
These are only two examples of wheels available for the fifth-gen Corvette in either a street or race application. Undoubtedly, as we get into the last half of 1998 and early-'99, we will see a lot more wheels that accept the OE sensors. For race-only applications, where the wheel sensors might not be important, there are a already plethora of choices.
A modification that's been popular with Corvette owners for decades is a lower restriction and/or more aggressive sounding exhaust system. There are a number of companies already in this market, such as Mid America, RK Sport, SLP and B&B Fabrication. Another player is Flowmaster, the well-known performance exhaust manufacturer. Flowmaster's, "cat-back" systems for Ô92-'96 C4s are one of the better values in Corvette accessories and it makes sense that the Santa Rosa, California company would be one of the first to market with a C5 system. Flowmaster's C5 exhaust is based on its new, 80-series mufflers which offer a more aggressive tone than the stock exhaust but with a minimal increase in interior ressonance. The mufflers and pipes are aluminized steel and the tips are 304 stainless. After the OE mufflers are cut off, the Flowmaster system clamps onto the stock pipes behind the rear axle. The production muffler hangers are retained.
Looking for more? At press time, Hypertech was working on a C5 version of their "Power Programmer Plus" which allows limited user recalibration of the powertrain control module. Hypertech's Chief Engineer, Blake Carpenter, told us the C5 unit is planned for a May or June introduction. The C4 version of this device can make limted changes in fuel and spark schedules along with, in the case of automatic cars, changes in shift points and firmess. We suspect that the C5 version will be similar in its abilities.
DRM sells an air filter assembly that incorporates a K&NÊFilter along with an "air box" of different design. Rippie claims it is worth 15 horsepower. K&NÊEngineering is working on their own air box that they say will be worth 19 horsepower. Lastly, DRM offers an oil cooler kit consisting of: a cooler, an adapter that accepts the oil lines and fits the filter mount on the LS1 oil pan, a remote oil filter mount that accepts the older, large size Chevrolet V8 filter and cooler lines. An oil cooler is a wise modification for hot weather autocross and all road race applications.
What about more complex (and expensive) engine-related modifications? Well, if you have 17 large, you can visit Lingenfelter Performance Engineering for one of John L.'s full-tilt-boogie, 6.27-liter, 450 horse, "uprated" LS-1s and end up with your C5 a potent weapon for fending off annoying ZR-1s, Vipers and such. LPE has individual components available such as CNC-ported cylinder heads and more aggressive camshafts. Though they've not been released for sale quite yet, DRM is planning a cylinder head and camshaft package for LS-1s, as well.
Another area DIYs like to delve in is exterior design changesÑfront air dams, hoods, rocker panels, deck spoilers and such. One interesting collection of C5 styling pieces we found comes from RK Sport out of Oceanside, California. They sell a unique hood, a rear deck spoiler and cool-looking inserts for the front fender vents.
All of these pieces were designed, on a freelance basis, by John Cafaro, the C5 Exterior Design Chief, exclusively for RK Sport. In fact, the hood design was once intended for production but was dropped when the GM legal/safety folks raised some questions about visibility over the its power bulge. RK's hood and deck spoiler are fiberglass and the grille inserts are urethane. In addition to those exterior items RK Sport will also have carbon-fiber, door sill plates, engine covers, fusebox and battery covers. All these items can be bought alone or as a kit.
Obviously, with this brief discussion of suspension upgrades, engine enhancement and body pieces we have by no means listed all sources for such products. A "C5 Parts Buyer's Guide" was outside the scope of this series. In the coming months, you can be sure Vette, America's Favorite Corvette Magazine, will offer more coverage of the C5 parts and accessories aftermarket.
Vette Magazine would like to thank Karen Kincaid and Tim Pierce of the GM Service Technologies Group, Corvette Service Readiness Team for special assistance in preparing this series of articles.
Sources:
| ACDelco Parts see your ACDelco or Chevrolet dealer www.acdelco.com |
B&B
Fabrication Inc. 5314 W. Luke Av. Glendale AZ 85301 888-228-7435 www.bbtriflo.com |
BBS of America,
Inc. 5320 BBS Dr. Braselton GA 30517 800-422-7972 |
| BFGoodrich Tires see your Goodrich/Michelin dealer www.michelin.com |
Doug Rippie
Motorsports 14070 23rd Av. Plymouth MN 55447-4900 612-559-7605 www.dougrippie.com |
Eckler's Division
of Smart Choice PO Box 5637 Titusville, FL 32783-5637 800-327-4868 www.ecklers.com |
| Fikse USA, Inc. Box 48080 Seattle WA 98166 206-248-1820 www.fikse.com |
Flowmaster 2975 Dutton Av. Santa Rosa CA 800-544-4761 |
GM Parts/GM
Performance Parts see your Chevrolet dealer www.goodwrench.com |
| GM Service
Technolgies Group (service manuals and TECH2) contact your Chevrolet dealer |
Goodyear Tire and
Rubber Co. see your Goodyear dealer www.goodyear.com |
Hotchkis
Performance Suite 13 12035 Burke St. Santa Fe Springs CA 90670 562-907-7757 |
| Hypertech 1910 Thomas Rd. Memphis TN 38134-6315 901-382-8888 |
K&N
Engineering PO Box 1329 Riverside, CA 92502 800-858-3333 www.knfilter.com |
Kent-Moore 28635 Mound Road Warren MI 48092 800-345-2233 |
| Kumho (autocross tires only) Cut Division 104 N. Park Royal IL 61871 888-775-8646 |
Lincoln
Automotive 1 Lincoln Way St. Louis MO 63120-1578 800-245-3862 |
Lingenfelter
Performance Engineering 1557 Winchester Rd. Decater, IN 46733 219-724-2552 www.lingenfelter.com |
| Mac Tools Box 32940 Columbus OH 43232 800-848-6500 |
Mid America
Designs, Inc Box 1368 Effingham IL 62401 800-500-8388 www.madvet.com |
Mobil Oil
Corportation 8680 Willow Oaks Corporate Dr. Fairfax VA 22031 703-849-4588 www.mobil.com |
| OTC 655 Eisenhower Dr. Owatonna MN 55060 800-533-6127 |
RK Sport 214 Via El Centro Oceanside CA 92054 800-214-8030 www.rksport.com |
Red Line
Synthetic Oil Corporation 6100 Egret Court Benicia CA 94510 800 624 7958 www.redlineoil.com |
| SunPro 9999 Walford Av. Cleveland, OH 44102-4621 216-651-9200 www.actron.com |
Yokohama Tire
Corp. Box 4550 Fullerton CA 92834 800-423-4544 www.yokohamatire.com |