|
Building the Tom Henry RS
Part 5,
Page
3
Road
Test
With
the Eibach/Global West spring combo, QA1 Shocks,
upgraded Track Bar and SFCs in place, it was time to
road test and we started with some miles on city streets
and urban/suburban freeways. First thing we noticed? The
shock settings of 4-clicks, compression, 6-clicks,
rebound proved a good compromise between control and
comfort for around town driving.
 |
|
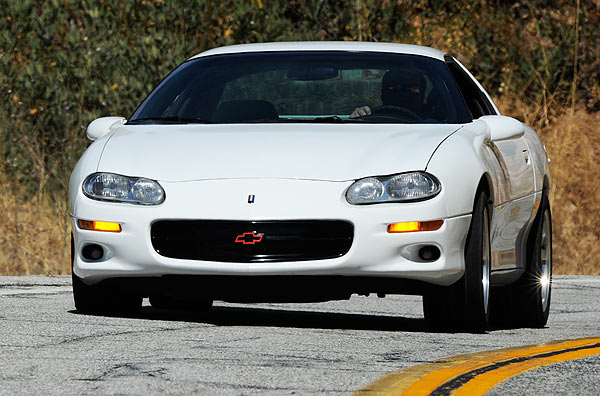
Road test fun! After our suspension
upgrade we ran the car over California's famed Angeles
Forest Highway. The car's lateral grip is substantial.
Its behavior at the limit is predictable and easy to
control. Could we lower the car a little more and
increase roll stiffness a bit? Perhaps, but this car is
street-driven every day on California's crumbling, urban
and suburban roads. We think a little more suspension
travel is a good thing for that usage. Image: Gary
Peterson.
|
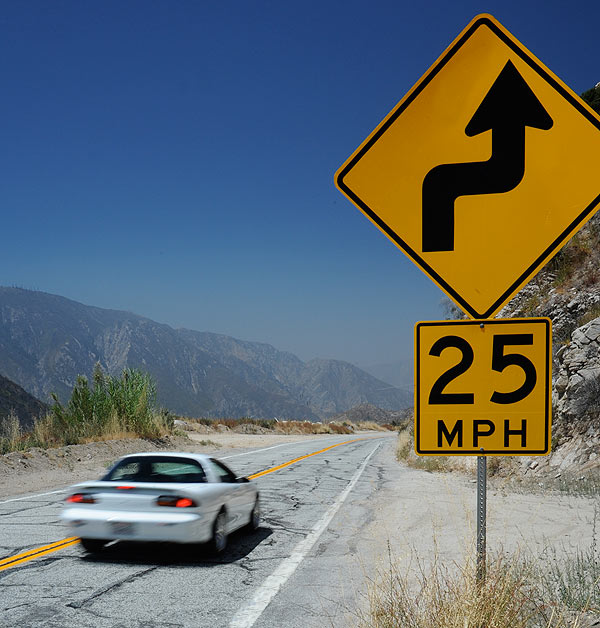
Next, we headed for some twisty, back-country roads to
really beat on this car. We didn't drive very far before
confirming that at the rear, the constant-rate springs
and double-adjustable shocks provided more consistent
suspension action and excellent damping. Because the
upgraded track bar was now height-adjustable, we could
adjust it a little lower than stock, providing even
better bite off corners or in drag-strip-style, standing
starts.
|
 |
|
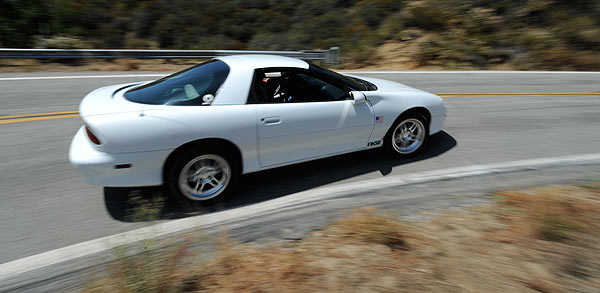
Where the Tom Henry RS's revised suspension
really shines is powering out of turns. The Global West
constant rate springs, TrackLink system and Track Bar
Upgrade allow the driver to get on the power hard and
early on corner exits.
Image: CHpg Staff. |
Expectedly, the Tom Henry RS is just a blast to drive
really hard. The car has a hell of a lot of lateral
grip. Plenty of roll stiffness, our front alignment
settings and the 265/40ZR17 Goodyear F1 Supercars (set
at 30-psi cold) on 17x9.5-in. Fikse Profil 5S wheels we
installed for Part Four make this car stick. The QA1s,
set at front, 6C7R and, rear, 5C7R, gave us outstanding
wheel control in aggressive driving, but might be a bit
harsh for daily-driver use. For race track use on
smoother surfaces, you'd probably want even more damping
and that's available from the QA1s by simply turning
their adjuster knobs.
The
THRS is generally neutral steering, but with little bit
of drop-throttle oversteer which can be used to control
yaw angle. Off the turns, as you roll on the throttle,
the car now really hooks. There's little doubt, the
Global West TrackLink and Track Bar systems enable the
4G F-car rear suspension get the power down in a way
that the stock suspension could never achieve. That's
probably why many road racers and autocrossers who run
fourth gens, use Global West Suspension parts.
 |
|
We also gave our rebuilt brakes and Baer pads a good workout. The new parts performed well.
Image: CHpg Staff.
|
Executive summary: our revised Tom Henry RS suspension
and brakes are freakin' awesome.
We Be Programmers
In Part 3 of the Tom Henry RS, we had aftermarket
calibration engineer, Ron Zimmer at Z-Industries
reprogram our Camaro's PCM and Ron’s son, Drew, worked
with us in Part 4. We have greatly appreciated the
Zimmers' help with the THRS, both this Internet version
and the shorter print version of this series which ran
in Camaro Performers but, for this fifth
part of the series, because we’re up for the challenge
of learning something new; we're moving our engine
controls calibration activities in-house.
From Summit Racing Equipment, we ordered a copy of
HPTuners “VCM Suite”, which includes “VCM Editor,” a
software application for creating aftermarket
calibrations for 1997 or later GM vehicles.
We picked
"HPT" because the guys at Z-Industries often used it
when working on our car and it’s
the leading software app for tuning. This software runs
on any PC using Windows XP or Windows 7 so I loaded it
onto my trusty Acer 5670 laptop.
|
 |
|
With the suspension and brake work complete and
validated, it was onto PCM tuning. The key hardware
parts of HPTuners VCM Suite are the "interface", at
left, and the editing and scanning software which runs
on a laptop PC loaded with either Windows XP or Windows
7. Image: CHpg Staff. |
With
the deadlines we have at the Camaro Homepage, our
learning curve for VCM Suite was pretty steep. There are
a several avenues by which one can learn to calibrate.
Find an experienced professional tuner who give you an
“internship"–great
idea but a rare opportunity. Search the Internet and
hang out on the numerous forums devoted to tuning–good
idea in theory, but in practice it’s
difficult to determine if what you’re
reading was posted by one of the many
“faux
experts”
who inhabit forums or by one of occasional, true
Internet tuning authorities who dispenses free
information. You can guess your way through using
“trial-and-error”
methods–probably
a bad idea. You can read some of the books on tuning
late model cars or, you can take classes on tuning. I
decided on a mix of the last two.
First, I
studied Greg Banish’s books, Designing and Tuning
High-Performance Fuel Injection Systems and
Engine Management: Advanced Tuning along with
Dyno Testing and Tuning by Harold Bettes and Bill
Hancock, all three published by CarTech Books. Then, I
went to school–I ordered a home-study class offered by
the “Tuning School” of Odessa, Florida in its “Tuning
the Right Way” series: A Beginner’s Guide to Tuning GM
Vehicles with HP Tuners Software.
I
found the Tuning School's curriculum indispensable in
our situation: needing to learn tuning basics in a short
amount of time. The class covers proven methods for
tuning a 1997 or later GM vehicle’s
PCM with HP Tuners. While the most of the material is
oriented towards students working with the Gen 3 or 4
V8s in late-‘90s
or later cars and light trucks, most of key techniques
you'll learn in the Beginner's class also apply to
writing calibrations for the 3800 Series 2 V6 in
’98-’02
Camaros.
 |
|
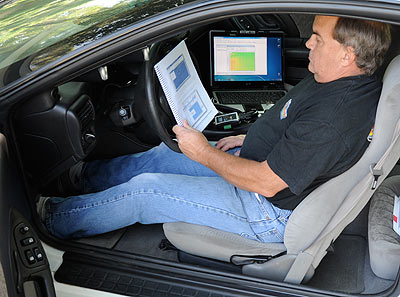
Newbie tuner at work. In our first attempts at
calibration work, we had the Tuning School's textbook
perched on the steering wheel and the Acer on the
passenger seat. Image: CHpg Staff.
|
A
week's worth of nighttime reading had me through the
Tuning School’s
beginner’s
text book. After that, I was out in the shop, sitting in
the car with my laptop on the passenger seat and the
book rested on the steering wheel, going over some of
the procedures in the text and learning VCM Scanner and,
finally, how to download the ECM's existing calibration
to my laptop. A week later, after some more study and
several hours working with VCM Editor, I was ready to
reflash the ECM in the THRS with my first calibration.
There's no way we could have gone from HPT newbies to
writing calibrations in two weeks without the Tuning
School’s
home study courses. No doubt, we still have more to
learn, but we were on the right track.
At first, we lacked a wideband oxygen
sensor–a requirement for any cal work involving power
enrichment (PE). While we shopped for one of those, we
started using what we learned from the Tuning School to
improve our 3800's part-throttledrivability by getting
its part-throttle, long-term fuel trim values closer to
zero.
When an engine control system
operates in closed loop, it's always “trimming” the fuel
delivery commanded by the look-up tables in the
calibration by the amount necessary to have the air:fuel
ratio (AFR) as close to “stoichiometric” combustion as
possible. A stoichiometric AFR results in the least
exhaust emissions and good fuel economy. With "straight"
gasoline, depending on its blend, stoichiometric
combustion occurs when the AFR is somewhere between 14.5
and 14.7:1. If it's the oxygenated gasoline required in
many parts of the country, it can have up to 10% ethanol
blended with the gas but usually the ethanol component
is 6-8%. We tested a sample of the Valero Premium gas we
usually put in the Tom Henry RS and it was about 7%
ethanol. We've read posts on various Internet forums by
folks who've tested their fuel and 7% is common. Mix 7%
ethanol (stoichiometric at 9:1) with gasoline (stoichiometric
at 14.64) and you get a 14.25:1 stoichiometric air: fuel
ratio.
In the calibration we were using, the
value for stoichiometric AFR was 14.57:1 and had never
been changed. That number is the stiochiometric AFR for
a special type of gasoline, known as "indolene clear,"
which car companies use when developing engine controls
calibrations or doing fuel economy testing. Since the
Tom Henry RS always runs on oxygenated gas, we reset the
base air:fuel ratio for the system to 14.25:1.
Why did we do this? Well–the engine
controls use the "stoich AFR" value in their calibration
as the "standard" to which to trim fuel delivery. If the
value set in the calibration is not the same as the
actual stoichiometric air:fuel ratio of the gasoline
being used, some of the ECM's fuel trimming ability will
always go trimming for the difference between the stoich
value in the cal and the actual stoichiometric AFR of
the gasoline. That can be half-a-point in air:fuel, or
more, that the ECM will always correct before it can
trim fuel delivery for any other reason.
If the AFR is exactly stoichiometric,
the long-term fuel trim (LTFT) values are zero. If the
AFR is more lean than that, the LTFTs will be positive,
ie: the system adds fuel to the base fuel schedule. If
the AFR is rich, LTFT numbers will be negative, ie: the
system subtracts fuel.
Our V6 is modified to the point that
its part throttle fuel needs were quite a bit different
than stock. Consequently, the system was trimming the
stock calibration’s fuel delivery schedule quite a bit
to maintain stoichiometric AFR. As the ECM moves between
cells of the cal’s “main VE" table, if long term fuel
trim (LTFT) has to move more than 5-7 counts from one
cell to the next, it may have to skew the fuel trim
quite a bit. That is: if most cells require -3 to +3
LTFT, that spread is more advantageous than if some
cells require -8 and other, adjacent cells need +10. The
more often the system has to move through a wide range
of less-then-ideal trim values to get to the proper
figure, the more drivability and response can be
compromised.
The Tuning School's book, MAF and VE
Tuning taught us how to use VCM Editor and VCM Scanner
to evaluate the existing part throttle calibration then
alter that to produce a new part throttle cal which
decreased the range through which long-term fuel trim
skewed as the ECM moved from cell to cell of the
calibration's main VE table. The result was improved
drivability. Since we were working with AFRs at or near
stoichiometric, where a narrow-band sensor has highest
resolution, we were able to use data from the engine's
stock O2 sensors.
The
Tuning School's book, MAF and VE Tuning taught us how to
use VCM Editor and VCM Scanner to evaluate the existing
part throttle calibration then alter that to produce a
new part throttle cal which decreased the range through
which long-term fuel trim skewed as the ECM moved from
cell to cell of the calibration's main VE table. The
result was improved drivability.
 |
|
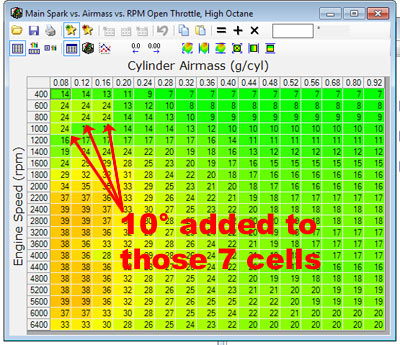
This screen shot shows the main, high-octane
spark table after we changed the spark timing at idle to
improve idle smoothness. Image: CHpg Staff. |
Another drivability issue we learned how to use HPTuners
to solve was idle stability and throttle response. A
couple of years ago, when the initial calibration work
was done for Part 3, a problem we could not fix was idle
speed surge.
We
knew from data taken using our Bosch Mastertech scan
tester and, of late, HPTuners VCM Scanner, that idle
spark timing was fluctuating between 3°
and 6°
BTDC. We believe this variation was a function of our
camshaft profile. This variation in idle spark timing
caused idle speed to surge. Plus, the retarded spark was
making the engine lazy just off idle.
When
we looked at the main spark tables with VCM Editor, in
the idle cells, the timing was a lot more than what we
were seeing when we took road test data with the
Mastertech or VCM Scanner. We suspected there were other
look-up tables which modify the base timing table at
idle but access to them is not supported by VCM Editor.
An email exchange with HPTuners Tech Support confirmed
that. They, also, told us that a future version of the
app will include support for those tables.
While there are some ways to access those idle spark
tables if you have your calibration in a binary (.bin)
file rather than in the HPTuners format and you acquire
some additional tuning software which can manipulate
.bin files, it was easier for us stick with HPT and
“fool”
the ECM into advancing the spark at idle by adding 10°
to the main spark tables in the cells where the engine
is idling. Doing that did not eliminate the hunting but
it reduced it significantly and vastly improved throttle
response just off idle. The engine's throttle response
went from "reasonable" to downright snappy.
Back
on the Dyno
At
this point, with a wideband not yet in our hands, we
wanted to do some WOT calibrating. We had a chassis dyno
session scheduled at Westech to test our recent exhaust
upgrades, so we decided to use the wide-band O2S which
is part of Westech's Superflow Autodyn dynamometer
installation.
 |
|
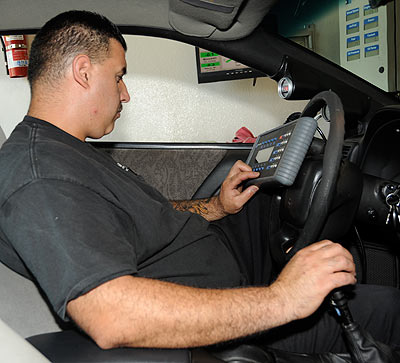
At Westech, dynamometer technician, Ernie Mena,
using the Superflow Autodyn's control module, sets-up
for a chassis dyno run. Image: CHpg Staff. |
First thing we
did was add enough Rockett Brand 100-oct.
unleaded racing gasoline to bring the octane of
the fuel in the tank up to about 95.5. Whenever
we're going to do any testing where we change
the fuel or spark spark calibrations, we start
with about 95-oct, to keep the engine out of
detonation. Once we have the fuel and spark to
where we think we like it, we'll validate with
91-oct and see how much, if any, knock retard
results. Next, we ran three passes to validate
the larger S-pipe and new cat. Finally, we
worked on the engine's WOT performance because,
previously, we had trouble with air:fuel ratio (AFR)
being too rich.
With HPT's VCM Editor,
looking at the "Power Enrich vs. ECT" table, we
could see the existing cal was commanding as low
as 11.2:1 AFR during PE. While that's quite rich
for gasoline–rich even when 7% ethanol is
blended in the gas–it's common with stock
calibrations. We changed that to 12.15:1, a
better choice for max power on 7% ethanol, then
had Westech’s Ernie Mena run another pass. The
rich condition was improved, but still not
right. The problem seemed time-related, ie: AFR
was ok for several seconds into a dyno run, then
it would still go rich and became inconsistent
at high RPM.
We discovered part of the
problem was the "Power Enrich Fuel Adder RPM vs.
Time" table. Once the system is in power
enrichment for a certain length of time, this
table adds additional fuel for cat overtemp
protection or as a detonation hedge. We decided
to disable this function below 20-seconds (about
the length of a fourth-gear chassis dyno run)
then reduce its effects by 50% during longer
periods of WOT operation. With that cal written
to the ECM, we had Ernie Mena make three more
runs on Westech’s AutoDyn. The AFR at WOT was
now in the 12.1-12.4 range which was better, but
still not consistent enough.
|
 |
|
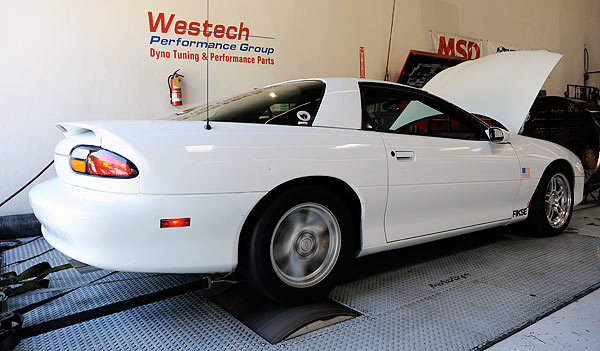
We had Mena run a series of dyno passes at
Westech to try out some revised ECM calibrations. Image:
CHpg Staff. |
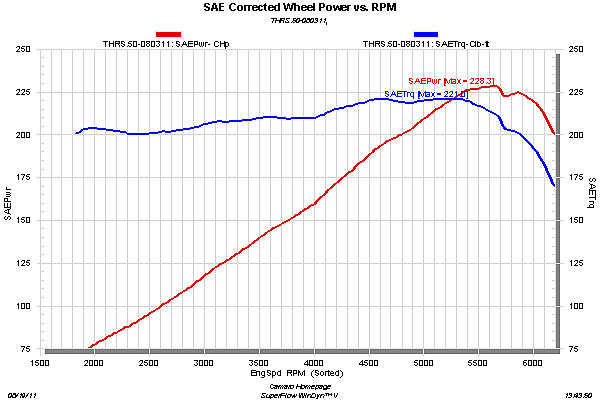
In spite of the AFR weirdness in PE,
in that final chassis dyno session for Part 5, we made
our best SAE-corrected, rear-wheel, peak power and
torque numbers yet:
228.3-hp@5660-rpm and 221.0 lbs/ft@4630-rpm. Using a
.82 correction factor, that works out to about 278-hp
and 270 lbs/ft SAE at the flywheel. The dyno data, also,
explains why the Tom Henry RS is such fun to drive. The
torque curve is flat as the proverbial pancake–between
200 and 225 lbs/ft rear wheel torque from 1800-5900 rpm.
 |
|
Dyno results from the best run of the bunch.
We're not sure what caused the little dip just past peak
power but, in Part Six, of the THRS series will try to
find out. Image: CHpg Staff. |
On
the dyno, using
“VCM
Scanner”,
we learned that at WOT and high rpm, the PCM was
commanding very high injector duty cycles. Running the
injectors for sustained periods at high duty cycle is
not recommended.
When
we looked into installing new injectors with higher flow
capacity, John Park at RC Engineering, the leading
supplier of high-performance electronic fuel injectors
in the aftermarket, told us if the sustained duty cycle
is 85-100%, the engine may have inconsistent air-fuel
ratio because the injectors are difficult to control
consistently when they are near full-open. RC
Engineering and other experienced tuners suggest
"larger" injectors when the sustained duty cycle is
greater than 85%. In Part Six of the THRS series, we'll
address that issue. We’ll,
also, have more on using HPTuners to further tweak our
ECM calibration. We'll work on that dip in the torque
curve just past peak power.
 |
|
Did our cal changes effect emissions? Nope.
Right after the dyno test, the car passed the
California Enhanced Smog Check. This time, for
hydrocarbons (HC), carbon monoxide (CO) and carbon
dioxide (CO2), the car was actually cleaner than it was
three months before, when we ran it through the Smog
Check prior to registration renewal. Oxides of Nitrogen
(NOx) increased slightly, but were still under the
limit. Image: CHpg Staff. |
The
final engine-related activity for this part of the THRS
series was to take the car to Mike Garibay's Quality
Auto Service in Pomona, California for an exhaust
emissions test. Garibay rolled the car onto his special
chassis dyno used for the California Enhanced Smog Check
procedure.
Once
again, the Tom Henry RS passed the Smog Check
easily–continuing proof that the right mod package and
the right tuning can provide a significant performance
increase combined with low exhaust emissions.
One
interesting lesson we learned during the time leading up
to our emissions test at Quality Auto Service. We had
code P0128 set because of the slow warm-up discussed in
the section on cooling system mods. We cleared codes
with our Bosch Mastertech but, when that happens, all
the second generation on-board diagnostics (OBD2)
“readiness flags” are wiped out, too. Those flags set in
the ECM once it determines various tests of emissions
controls, such as EGR function and catalyst efficiency,
which are required by OBD2, are ready to run.
State
emissions tests which have the test technician
connecting his equipment to the car’s diagnostic link
connector (DLC) will usually fail the car, regardless of
its tailpipe emissions, if readiness flags are not set.
Many scan testers, including our Bosch Mastertech and
the Actron AutoScanner discussed earlier, can display
readiness flags so if you cleared codes shortly before
going for a smog check, look at the flags with a scanner
before you test to verify they are set.
After
codes are cleared, the flags eventually reset during
normal driving but it can days hours, days, even weeks
for them to do so. You can force the flags to set in a
shorter time if you drive the car according to a
specific “drive cycle” listed in the Factory Service
Manual. Typically, this takes less than an hour.
We did
that–several times, in fact–but found some tests
remained incomplete. After thinking about this for a
while and re-reading the information about DTC P0128 in
the FSM, we decided to take out our 180° thermostat and
replace it with the stock 192° unit.
And
Voila! One drive cycle and all the flags set. Some of
those readiness tests, specifically the EGR function and
the catalyst monitoring tests, won’t complete unless the
engine coolant temperature (ECT) is higher than 180°F.
After the flags were set, we reinstalled the 180°
thermostat, took the car for the smog check and passed
easily.
Braless No More
This
project car is ten years old and will be on the road for
a number of years. Because of that, we decided to put
paint protection film (PPF) on our Camaro's front end–something
we probably should have done much sooner.
Known to the car hobby as a
“clear
bra”,
polyurethane PPF, was developed by the 3M Company for
aerospace applications. In 1990, the Department of
Defense made
“3M
Scotchcal”
famous when, during Gulf War I, it discovered the film
significantly reduced dust and sand erosion of
helicopter rotor blades during take-offs and landings in
the desert.
In
the early '00s, 3M introduced Scotchcal to the
automotive aftermarket but rebranded it as
“Scotchgard”,
a name more familiar to consumers. This adhesive-backed,
polyurethane PPF is 0.8-mil thick and is applied to
parts of the car’s
exterior which are susceptible to abrasion and pitting
from sand, dirt and small stones.
Clear bras usually can’t
be installed by DIYs because of the difficulty in
working the product. A proper installation takes
training, experience and special equipment. 3M has a
nationwide network of factory-trained installers. After
some research, we found the best clear bra installer
near the THRS base of operations, was Transhine Auto
Detailing in Whittier, California.
Transhine's owner, Bill DeBever, has been in the auto
detailing business since 1981 and has been installing
clear bras on cars and trucks since the early
‘00s.
He told us that Scotchgard and 3M’s
other PPF, Ventureshield, along with competitors from
Avery, XPEL Technology and others, have similar price
points. DeBever says Scotchgard is the most durable,
however, it is, also, the most difficult to install.
DeBever recommended Scotchcal for cars like ours which
see high annual mileage.
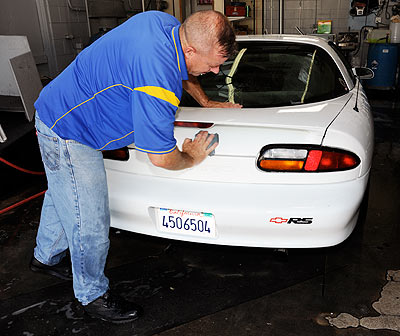
When
we arrived at Transhine, Bill gave our Camaro the
once-over then announced that, because a clear bra must
be installed over a clean surface and that our car's
paint was in reasonably good condition, but its finish
was covered with contaminants and water spots; it would
be best to do Transhine's full
“Exterior
Polish and Wax Detail”.
We couldn't argue with the $165.00 price. It was a heck
of a deal considering how much work the THRS's exterior
needed.
 |
|
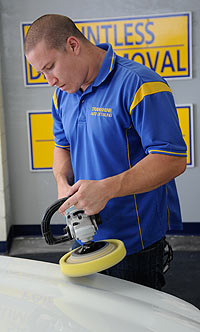
Transhine's Bill DeBever at work, clay barring
the THRS. A secret of detailing is to clay bar the
exterior while it's still wet after rinsing. Image:
CHpg Staff. |
 |
|
Once the car has been clay barred, then it's
rinsed a second time and dried. Image: CHpg Staff.
|
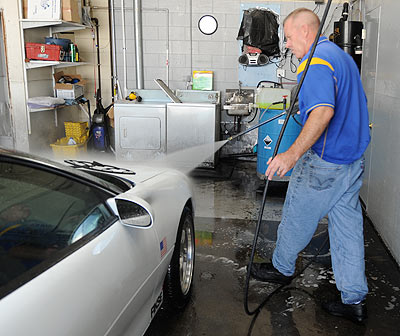
During the Exterior Detail, the entire body was
clay-barred during the water rinse stage of the car wash
process. Water spots were removed with a special
chemical which Transhine applies, lets stand for a short
period then wipes off. After that, the car was
re-rinsed, dried and moved to Transhine's PPF
installation bay to have the clear bra installed. We
were surprised how much
“whiter”
the car looked after being clay-barred and having the
water spotting removed.
 |
|
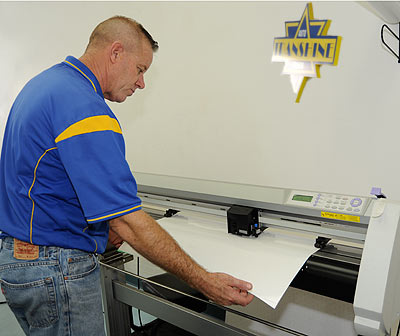
The clear bra installation begins with
downloading a pattern from a pattern vendors and loading
that into a PC. The computer controls an automated
cutter which cuts the pattern into the film. Image: CHpg
Staff. |
The
sections of Scotchgard are cut from long rolls of film
by a computer-controlled machine. The pattern is in
software running on a PC and Transhine has patterns for
most cars and light trucks. A water-soluble lubricant is
sprayed on the front end bodywork and then the film is
laid in place. Once the film is positioned, the lube and
any air bubbles which develop are squeegeed away with
special rubber blades designed for applying PPF. The
tough part of a clear bra installation comes when
installing the film on body work having compound curves
or other complex shapes. A special "steamer" is used to
soften the film when its applied to parts of the body
having sharp corners.
 |
|
Once the clear bra was in place, the car was
moved to Transhine's exterior detailing area where wax
was applied and buffed by Ryan Kreiss. Image: CHpg
Staff. |
|
|
 |
|
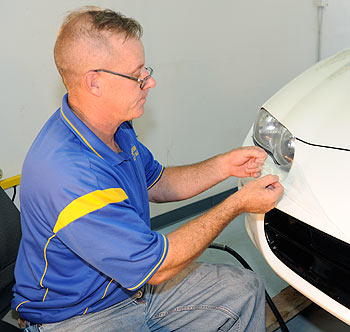
Installing
ScotchGard PPF requires training, skill
and, in some situations, special tools,
such as a steamer. First the film is
wetted with a solution which allows
repositioning of the film once it's
applied. DeBever places it on the panel,
positions it, squeegees away bubbles and
pushes the edges in place. On a surface
with tight or compound curves, the
steamer is used to warm the film and
make it more pliable. Image: CHpg Staff. |
|
It
took Bill DeBever a couple of hours install a clear bra
and, after watching the installation, we can see why
training and experience are necessary. We were relieved
to have Transhine do the work and appreciated the
quality DeBever put into the installation. Once the
Scotchgard PPF was on the car, it was moved back to
Transhine's polish/wax area where the exterior detailing
was completed.
In
the next part of the Tom Henry RS project, we’ll
upgrade our V6’s
fuel injectors and install nitrous oxide injection. Stay
with us.
 |
|
Image: CHpg Staff.
|
Sponsors
Apex
Tool Group
(Gear Wrench)
Suite A
14600 York Rd.
Sparks MD 21152
800.688.8949
www.gearwrench.com |
Autotronic Controls Corp. (MSD)
1490
Henry Brennan Dr.
El
Paso TX 79936
915.857.5200
www.msdignition.com |
Baer
Brake Systems
222
West Peoria Ave
Phoenix AZ 85029
602.233.1411
www.baer.com |
|
Big John's
Performance, Inc.
24233 Creekside Rd.
Valencia CA 91355
661-254-1611
www.bigjohnsperformance.com |
Bosch Diagnostics
2030
Alameda Padre Serra
Santa Barbara CA 93103-1716
800.321.4889
www.boschdiagnostics.net |
CarTech Books
39966 Grand Ave.
North Branch, MN 55056
800.551.4754
www.cartechbooks.com |
Denso Sales of California, Inc.
3900
Via Oro Av.
Long
Beach, CA 90810-1868
310.834.6352
www.densoaftermarket.com |
Design Engineering
604
Moore Rd.
Avon
Lake OH 44012-2315
800.264.9472
www.designengineering.com |
Eastwood Company
263
Shoemaker Rd.
Pottstown PA 19464
800.345.1178
www.eastwood.com |
|
Engine Pro Performance
4891
Independence Street, Suite 155
Wheat Ridge CO 80033
800.364.4631
www.enginepro.com |
Extreme Performance Heat Coatings
515
N. Elevar St.
Oxnard CA 93010
805.981.3888
www.xtremeperformanceheatcoatings.com |
Fel-Pro
26555 Southwestern Highway
Southfield MI 48033 |
Fikse Wheels
Suite 110
667
Sumas Way,
Abbotsford BC V2S 7P4
Canada
877.856.7311
www.fikse.com |
Flowmaster
Suite 125
100
Stony Pt. Rd
Santa Rosa CA 95401
800.544.4761
www.flowmastermufflers.com |
FLUIDYNE
202
Raceway Dr.
Moorseville NC 28117
888.358.4396
www.fluidyne.co |
|
Global West Suspension
655
S. Lincoln Av.
San
Bernardino CA 92408
877.470.2975
www.globalwest.net |
Goodyear Engineered Products
703
S Cleveland-Massillon Rd.
Fairlawn OH 44333
888.899.6354
www.goodyearep.com |
HP
Tuners, LLC
725
Hastings Ln
Buffalo Grove IL 60089
www.hptuners.com |
|
Katech
24324 Sorrentino Ct.
Clinton Twp MI 48035
866.528.3241
www.katechengines.com |
Kimberly-Clarke (Wypalls)
400
Holcomb Bridge Rd.
Roswell, GA 30076
800.241.3146
www.wypall.com |
Matco Tools
4403
Allen Road
Stow, Ohio 44224
866.288.8665
www.matcotools.com |
Motive Products
Unit
G
5750
Obata Wy
Gilroy CA 95020
408.846.8800
www.motiveproducts.com |
QA1
Motorsports
21730 Hanover Av.
Lakeville, MN 55044
800.721.7761
www.qa1.net |
Quality Auto Service
3460
Falcon St.
Pomona CA 91767
909.596.5502 |
RC
Engineering
20807 Higgins Ct.
Torrance CA 90501
310.320.2277
www.rceng.com
|
Red
Line Synthetic Oil Corporation
6100
Egret Court
Benicia CA 94510
800.624.7958
www.redlineoil.com |
RockAuto, LLC
6680
Odana Road
Madison WI 53719
866.762.5288
www.rockauto.com |
SPX
Corp. (Actron)
15825 Industrial Parkway
Cleveland OH 44135
800.228.7667
www.actron.com |
SPX
Kent-Moore
28635 Mound Rd.
Warren MI 48092-3499
800.578.2233
www.spxkentmoore.com |
Sunshine Makers (Simple Green)
15922 Pacific Coast Highway
Hunington Harbor CA 92649
800.228.0709
www.simplegreen.com |
Transhine Auto Detailing
15130 E. Whittier Bl.
Whittier CA 90603
562.693.5619
www.transhine.com |
The
Tuning School
Unit
A
2328
Destiny Way
Odessa, FL 33556
727.264.8875
www.thetuningschool.com |
Tom
Henry Racing
5886
Route 8
Bakerstown PA 15007
877.842.4389
www.tomhenryracing.com |
Valco Consumer Products
411
Circle Freeway Dr.
Cincinnati OH 45246
800.788.386
www.valco-cp.com |
Westech Performance Group
11098 Venture Av.
Mira
Loma CA 91752
951.685.4767
www.westechperformance.com |
Yella Terra USA
1935
Tommy Webb Dr.
Meridian MS 39307
601.485.3355
www.yellaterra.com.au |
|
Summit Racing
Equipment
800.230.3030
www.summitracing.com
|
Rockett Brand
Racing Fuels
Suite 75
3703 W. Lake Avenue
Glenview IL 60026
800-345-0076
www.rockettbrand.com |
|
Return
to Project Index Click Here
|