Building the Tom Henry RS
Part One: Easy Stuff First
Since
Camaro's 1967 debut, a six-cylinder engine ('67-'79,
I-6; '80-'02 and '10-up V6) has been either standard or,
for four years in the early-’80s when General Motors
made the awful mistake of an inline-four for a base
engine, a midlevel option.
For
the Camaro's first ten years, V8s outsold sixes by a
considerable margin, but in 1977, with our country in
the throes of an agonizing gasoline shortage, V6s sold
on par with V8s. From then on, until production
temporarily ceased after model year 2002 (MY02),
six-cylinder market penetration averaged 50.4% and, for
MY93-02, V6es sold 62.4%. Bottom line, there’s a ton of
sixes out there, especially in fourth generation Camaros
and that trend is sure to continue with the fifth
generation, 2010-up cars.
One
reason V6es sold well towards the end of the 4th Gen era
was the 200-hp, 3.8-liter engine introduced in halfway
through 1995. Called “3800 Series 2”, it’s the unblown
version of the supercharged motor used up to MY05 in the
Impala and Monte Carlo SSes. By mid-'90s standards, for
buyers looking for a sporty coupe but for whom
performance was a consideration but not the most
important one, this offered a more affordable
alternative to the V8-powered Z28s and SSes.
Back
in late-'05 and early-'06, when gas prices went bonkers,
visitors to our parent company, Tom Henry Racing (THR)
about V6es. Aftermarket companies tell us demand for V6
performance products has grown indicating interest in
hot-rodding those cars. There are even web sites devoted
to V6 Camaros at www.forum.camarov6.com and
www.3800pro.com/forum/.
 |
|
Here's our project car.
It'll take us about year but it will
end-up as the Tom Henry RS and will use
a few general ideas we hope to see in
the '09 base Camaro. Image: CHpg staff. |
We
decided to jump on the bandwagon, acquire a 2001 Camaro
V6, 5-speed and try some mods. We're calling the car a
"Tom Henry RS", in honor of the famed V8-powered Tom
Henry SS "tuner" Camaros of '01 and '02. Since we're
starting this project in the dead of winter, we've
farmed the job out to THR's, West Coast development
"laboratory" near Los Angeles.
Our
goal is more exciting street performance, not building a
drag race car. In addition this project is a little bit
of "what-if". We want to modify the engine to about the
300-hp level to match the performance of a 2010 Camaro.
Additionally, we're going to modify the suspension of
this 4th Gen V6 and see what happens.
Our
engine mods will pass a state exhaust emissions test and
won't degrade low-end torque. Our suspension
enhancements will improve handling but will still have
the car riding reasonably nice enough for commuting over
the rough surfaces of freeway/expressway systems in
cities with the worst roads in the country, such as
Philadelphia, Detroit and Los Angeles.
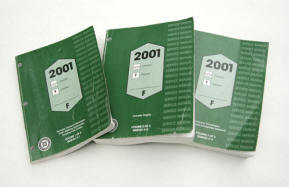
Before
we start working, let's talk about service data because
information is power–power over your Camaro if you work
on it yourself. Unless you’re an experienced Camaro
technician, you need a factory service manual (FSM) from
Helm, Inc., publisher of GM all service data. Our
2001 Chevrolet Camaro Service Manual was
indispensable in preparing this series.
|
 |
|
Information is power. The
best service information on any Camaro
comes in the factory service
manual--actually, in this case, three
manuals. Image: CHpg staff |
|
A downside of
the factory manual is cost. Some of the stuff we
are going to do to the Tom Henry RS is discussed
in the less-expensive,
1993-2002
Camaro Haynes Repair Manual.
While the Haynes omits some front suspension
information, suggests some questionable tool
choices, and erroneously states you can’t work
on the brakes without a scan tester; it's an
acceptable reference for those on a tight budget
doing regular maintenance or basic repairs. On
the other hand, if you're getting into engine
controls diagnosis or heavy mod'ing, buy the FSM. |
What
about parts? Most of the GM and aftermarket parts we're
going to use during the next 12-months or so can be
sourced from Tom Henry Racing, the performance parts
sales division of Tom Henry Chevrolet. In the case of
the few parts which can't be purchased from THR, we'll
tell you where to get them.
The
staff of Tom Henry Racing's parts operations, headed by
Parts Manager, Stan Lorence, stands ready to assist any
Camaro Homepage visitor in finding Camaro parts.
Additionally, the people at Tom Henry Racing's Service
Department, headed by Manager, Cory Henderson, can
install many of the modifications discussed in this
series.
First
Mods
After
wheels and tires, perhaps the most popular aftermarket
modification performed by Camaro fans is the addition of
an aftermarket exhaust system. Flowmaster’s American
Thunder system for ‘98-’02 Camaros with 3800 V6es (PN
17358) has larger, 2.5-in. aluminized pipe, an 80-series
muffler and stainless steel tips, all typical Flowmaster
features. It's unique part is a resonator,
cleverly-packaged beneath the passenger-side rear seat.
Flowmaster says that certain frequencies of V6 noise are
difficult to attenuate and this resonator facilitates
that. One Saturday, we got the car up on jack stands and
installed the American Thunder system using hand tools.
We demanded increased performance, improved sound and
better appearance. Flowmaster’s cat-back got us all
three.
|
 |
|
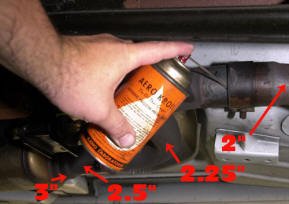
When we tried to get the
stock exhaust off, we found the
slip-joint behind the cat rusted tight.
An overnight treatment with Sili-Kroil
aerosol, one of the best penetrants on
the market sold by Eastwood Company, and
some additional blasts with Sili-Kroil
as we beat the old exhaust off with a
hammer, finally brought success. It's
amazing the restriction in this area of
the system where there are four
reductions in pipe size. The Flowmaster
exhaust eliminates the final step.
Modifications we'll do later in the
project will eliminate the third step.
Image: CHpg staff. |
|
|
 |
|
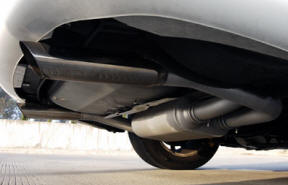
The Flowmaster exhaust for ’98-’02, V6s. Similar systems
are available for ’95-’97s 3.8s (PN 17357). It uses
stock exhaust hangers, comes with hardware and has
large, stainless steel tips. The sound is the seductive,
deep tone for which Flowmasters are famous. Image: CHpg
staff. |
|
|
Chassis dynamometer testing will be a key
part of this project series. All of our
chassis dyno work will be done by the
Westech Performance Group in Mira Loma,
California. Westech's owner, Rick Stoner is
a long time Chevrolet enthusiast and owns a
number of Chevy hot rods and classic
Corvettes. Westech's key specialties are
dynamometer testing, both engine and
chassis, and custom engine building.
Westech’s SuperFlow SF840 chassis
dynamometer is a state-of-art piece of
equipment which can be run in either the
"brake dyno" or "inertia dyno" modes. For
simple performance validation, Dynamometer
Test Technician Ernie Mena typically runs
the SF840 as an inertia dyno. |
|
 |
|
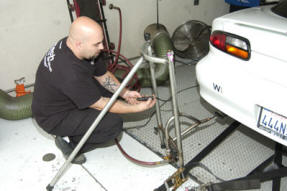
This is
Ernie Mena setting-up a wide-band O2 sensor
prior to one of the many tests we ran at Westech
Performance Group in the process of modifying this car.
Westech uses a unique, vacuum assisted O2S sensor which
quickens the system's response. Image: CHpg staff. |
|
|
 |
|
This is the Vericom VC3000 which replaced the veteran,
VC2000 a couple of years ago. It has typical Vericom
features: two-axis accelerometer core, 400Hz sampling
rate, and ability to upload data to a PC. New with the
3000 are: larger 128x64 LCD screen, ability to recall up
to 256 tests from memory, better keyboard, better
mounting system, USB port and–we saved the best for
last–with the DAQ model, ability to record OBD2 data via
the car's diagnostic link connector (DLC) as well as
from up to six accessory sensors. In our experience, the
Vericom VC3000's larger display and improved keyboard
make it nicer to use and the built in bubble levels are
a handy feature. Image: Vericom Computers. |
|
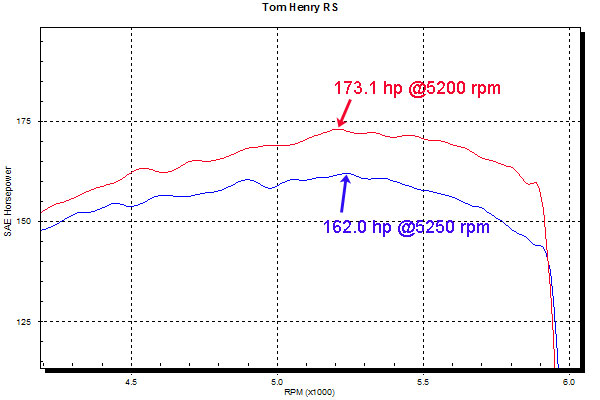
Westech's Superflow
showed our V6 with the Flowmaster American
Thunder exhaust system gained a hair over 11,
horsepower (SAE-corrected) at the rear wheels
and road test numbers backed that up. Using a
Vericom VC3000 Performance Computer, an on-board
vehicle dynamics tester, we saw 0-to-60 time
decrease from 7.83 to 7.44-sec. and quarter mile
stats going from 16.15-sec./89.14-mph to
15.87/90.69.
Eleven horsepower and
nearly two tenths and a mile-and-a-half an hour in the
quarter is an outstanding improvement for just an
exhaust change on a car which, in stock trim, made only
162-hp (SAE) at the wheels. Clearly, the O.E. exhaust is
restrictive. In addition, it was too quiet, sounded
funky and had ugly tail pipes. The American Thunder
system gives that deep-toned, trademark Flowmaster sound
and its stainless outlets look a lot better. The Aussies
at Holden, who are doing most of the vehicle development
of the 2010 Camaro, need to listen to our project car so
they won't make the same mistake made by GM on the 4th
Gen car and put a wimpy exhaust on V6es.
|
|
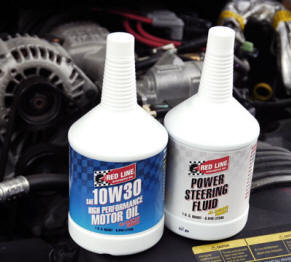
At Tom Henry Racing we put lubricants from the Red Line
Synthetic Oil Corporation in a lot of customers'
modified, street high-performance Chevrolets. From the
Cobalt SS Supercharged to the Impala SS and from the
Camaro to the Corvette Z06, just about any hot rod Chevy
can benefit from Red Line's premium synthetic products.
In this project car, we
used Red Line 10W30 Engine Oil, Red Line Power Steering
Fluid in the power rack-and-pinion steering system, a
50/50 mix of Red Line D4 ATF and Red Line MTL in the
car's TREMEC T-5, five-speed transmission and Red Line
Heavy Shockproof Gear Lubricant in the rear axle. The
gain was slight, 1.5hp (SAE) at the wheels, so the chief
advantage of Red Line products is their enhanced thermal
stability and the better durability of powertrain
components which comes from that. There’s also
the possibility of extended engine oil drain
intervals, if we choose. |
|
 |
|
We began
our Red Line Synthetic conversion with
10W30 Engine Oil, and Power Steering
Fluid. Image: GHpg staff. |
|
|
 |
|
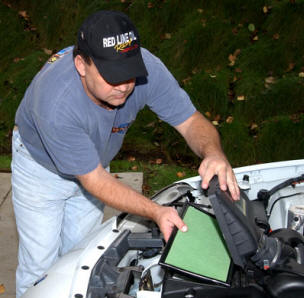
Going
Green is easy. Pop open the filter
housing, remove the dirty, stock filter
and slip in the Green. Image: CHpg staff. |
|
We wanted an oiled
cotton air filter so we added a “Green Filter” (PN 2021)
we got from THR. While many filters have cotton media, a
Green uses two layers of woven cotton which are thinner,
stronger and hold filter oil better than the gauze used
by K&N and others. The Green Filter people say that,
because it’s woven, the thinner material still traps
particles as small as 5 microns. More interesting is
what they claim about filters with injection-molded
edges. During molding, rubber can leak onto the filter
which reduces its area. Since a Green’s edges aren’t
injection molded; that can’t happen. When we compared a
Green to an injection molded K&N Filter, sure enough; we
noticed that difference. |
|
 |
|
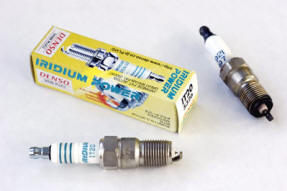
The
stock, ACDelco 41-921 (top right) and the Denso
IT-20. They are different designs--the ACD plug is
platinum-tipped, the Denso uses an iridium tip and is,
also, a colder heat range, better suited to an engine
which runs hard. Image: CHpg staff. |
|
|
 |
|
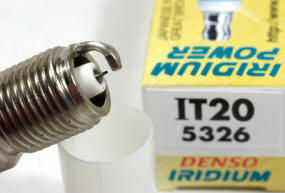
The Denso "Iridium Power"
IT-20 has a very small, Iridium center
electrode along with a cut-back and
tapered, ground electrode. Both these
features allow the air-fuel mix in the
combustion chamber increased exposure to
the spark. As a tip material, Iridium
has as good or better durability than
platinum, but lower resistance. That
lower resistance can make a more
powerful spark available at the plug.
Image: CHpg staff. |
|
Dyno
runs, quarter mile testing and aggressive street driving
made colder spark plugs desirable, so we installed Denso
IT-20 Iridium Power plugs which are sold by THR. The
IT-20 is one heat range colder and its iridium tip is
more durable but has less resistance than the stock
platinum, AC Delco plugs that were in the engine when we
started. The Densos' small, 0.4-mm center electrode and
tapered ground electrode give the spark maximum exposure
to the incoming, air-fuel charge. We should add that
even General Motors must see merit in the Denso spark
plug design because after about 2004, some Chevrolets
have Densos from the factory.
|
 |
|
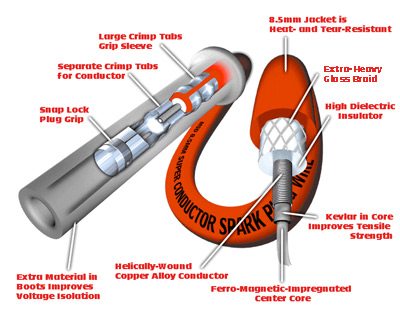
MSD Super Conductors are the same length as the stock
wires. The 8.5-mm. MSDs fit the stock wire looms. Red
wire and gray boots add a little color to an otherwise
colorless engine. Image: CHpg staff |
|
 |
|
The
8.5mm Super Conductor Spark Plug Wire
has many design features intended to
meet the reliability/durability needs of
NASCAR NEXTEL Cup race engines. Image: Autotronic
Controls Corp |
|
|
We put MSD’s Super Conductor plug wires (PN 32089) on
our modified 3800. Their design came out of stock car
and road racing several years ago. They have low
resistance but radio frequency interference (RFI)
suppression equal that of stock wires. The Super
Conductor core is Kevlar around which is a
tightly-wound, copper wire. A foot this stuff has about
40-feet of coiled wire which acts like an RF choke and
suppresses RFI. The outer sleeve is heat, abrasion and
tear resistant. Add super grippy connectors and durable,
heat-resistant silicone boots, the choice of black or
red and you’ve got a great plug wire. Super
Conductors’ lower resistance increases the performance
margin of our ignition system, which could come in handy
later, and the high suppression keeps the Tom Henry RS's
Monsoon sound system noise-free.
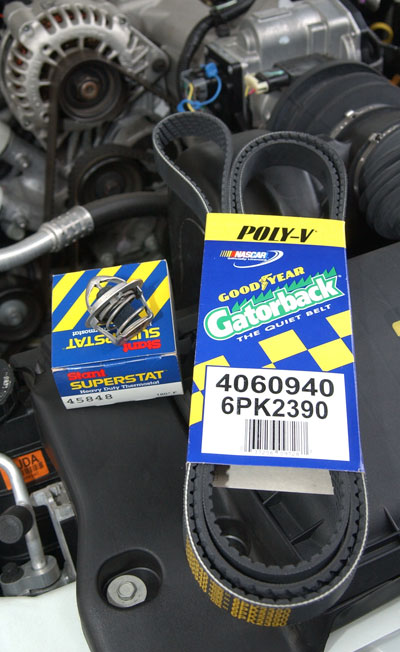
We stuck a Stant 180° thermostat (PN 45848) in
place of the stock 195° unit. Running the
cooling system at 180° may reduce the engine’s
tendency to detonate and will improve durability
of underhood rubber and plastic. Next we swapped
the O.E. drive belt for a Goodyear Gatorback
Poly-V belt (PN 4060940). Its diamond-checked
back allows the Gatorback to run up to 15°
cooler, extending belt life. Lastly, we added a
bottle of Red Line WaterWetter to the coolant.
WatterWetter can improve cooling performance
when the engine is run hard. |
|
 |
|
The
Goodyear Gatorback belt, by virtue of its
diamond-checked backing, generates less heat as it
flexes around the pulleys. This lengthens belt life. The
Stant 180 ‘stat is an easy swap on a 3.8L V6. CHpg
staff.
|
|
|
 |
|
The Goodyear Eagle
F1 GS-D3, known for its “flying-V”
tread, is an outstanding performer on
wet roads and one of the better,
all-round, ultraperformance radials on
the market . CHpg staff. |
|
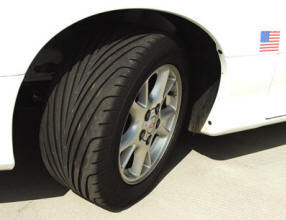
Speaking of Goodyear, the last big American tire
company, its Eagle F1 GS-D3 is a killer, all-weather,
ultraperformance radial tire. It has good dry traction
and, by virtue of its distinctive tread pattern which
aggressively channels water away from the tread, great
performance on wet roads. It also has excellent tread
life and low noise characteristics. Lastly, it has
Goodyear’s neat “Rim-Guard” feature which lowers the
chance of wheel damage if we scrape a curb. We swapped
the stock, T-rated, 235/55R16s for a GS-D3s in
P245/50ZR16. As these Z28-sized tires fit on our stock
16x8-in. wheels, the switch was simple. We ordered the
GS-D3s from Tucker Tire in Covina California, then had
Tucker’s professionals mount and balance them. |
|
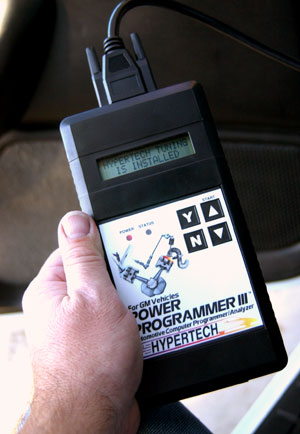
Now, we needed a little
DIY computer reprogramming. We used a Hypertech Power
Programmer (PN 30009) to lower our engine control
module's (ECM) fan-on temperatures to match the 180°
thermostat, to alter the vehicle speed limiter above
what was stock with T-rated tires and optimize the
speedometer calibration for the
slightly-smaller-diameter, Goodyear F1 GS-D3s.
Working a Little Harder
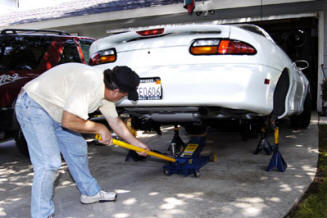
The first mods where
easy but now, we’ll earn our pay. Under the back of this
Camaro was that gleaming Flowmaster exhaust but a
nasty-looking rear end. We didn’t want to take the rear
end apart to have the housing grit blasted before we
could paint it because, then we’d have to set-up the
gears. Not!
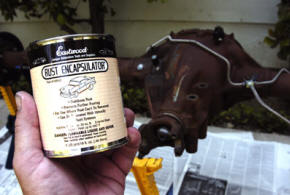
The Eastwood Company
has a paint called “Rust Encapsulator” which spokesman,
John Sloane, told us, “...is a slow-cure enamel,
fortified with a fine glass-flake amendment which seals
the surface.”
Seal the surface and
rusting virtually stops. “R.E.” can be used alone or as
a primer, over which you can apply just about any paint.
It’s intended for spray application after thinning with
20% lacquer thinner, but can be brushed on, if you add
10% retarder.
|
|
 |
|
ECM calibration was a task with which we became very
familiar on this project. Our first attempt, was pretty
basic. We used a Hypertech Power Programmer to lower the
fan-on temps and to change the ECM’s tire size
programming to work with the 245/50ZR16 Goodyears. As
time went on, as you'll read in future installments of
this project, calibration became our bane. CHpg staff. |
|
|
 |
|
Our
initial experience with Rust Encapsulator was
brushing it on but buying the aerosol version is a
better idea. Either way, RE saved a lot of work. CHpg
staff. |
|
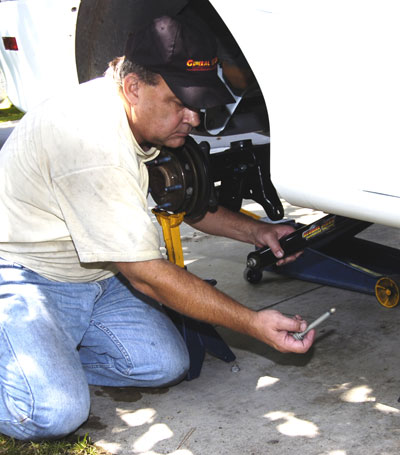
We plugged the brake
hose connection on the chassis, then got the Camaro’s
axle out, stripped-off the brakes, capped-off the
caliper hoses, masked its vent and ABS sensor
connection.
Some aftermarket
service data, like the
Haynes Repair Manual,
claims you shouldn’t remove brake components because
that lets air in the system then a scan tester is
required to bled it. That’s bunk. It is true that, in
the unlikely situation that you loose enough brake fluid
such that the ABS brake valve drains, you need the scan
tester to bleed the ABS; however, when you remove the
rear axle or the front calipers, immediately plug the
connections on the chassis and the brake hoses. Once you
reconnect the brake plumbing, bleed the brakes manually
to get the small amount of air out of the lines and
hoses and you're set. |
|
 |
|
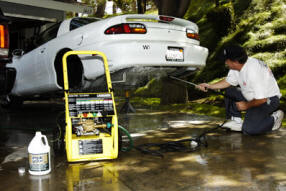
Since we
had both the Flowmaster exhaust off and the
rear axle out, not only did we use the Karcher 2650HH to
wash the rear axle but we blasted the whole underneath
of the back of the car. Image: CHpg staff. |
Next we cleaned the
rear axle with warm water and Simple Green using a
Karcher 2650HH Pressure Washer we bought at Costco. We
blew the axle dry with shop air, masked-off the brake
hoses and the parking brake levers then painted it with
Rust Encapsulator (PN16040Z). After overnight drying, we
shot it with Eastwood Extreme Chassis Black (PN11175Z).
After a second overnight dry we reinstalled the axle,
reassembled the brakes then bled the rear calipers. |
|
 |
|
“Chassis
Black” has been around for years but,
recently, Eastwood revised its formula,
adding to the product’s already good
durability. We used new, “Extreme
Chassis Black” on the Camaro’s rear axle. How ‘bout that snazzy
spray gizmo on the can? We found that at Ace Hardware.
Image: CHpg staff. |
|
|
 |
|
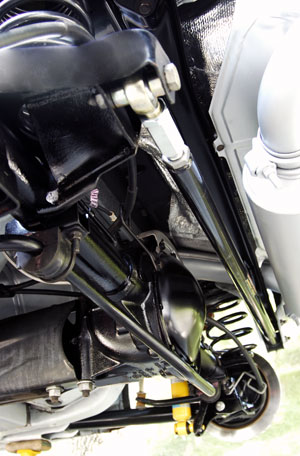
Getting
the axle in-and-out of a 4th-gen is easy and moving it
is a snap with a floor jack. A second set of jack-stands
supported the axle while we hung the new suspension.
Image: CHpg staff.
|
|
Global West Suspension
Systems, an engineering-driven manufacturer of
high-performance suspension pieces for Camaros and other
Chevys, has a brand called “Quiet Ride”. These products
combine polyurethane or rubber bushings with spherical
bearings for a decrease in deflection but only a modest
increase in harshness. Quiet Ride parts are for
high-performance street use, not racing, and are
available from Tom Henry Racing.
|
|
 |
|
The GW rear arms each have a rubber bushing and a
spherical bearing. Rubber goes in the body pickup point
and the bearing bolts to the axle. Image: CHpg staff. |
|
 |
|
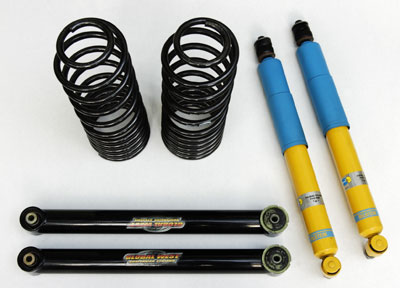
Here are
most of the pieces we used in the rear.
The Bilsteins have heavy-duty valving which improve the
handling of any 4th-gen Camaro. Image: CHpg staff. |
 |
|
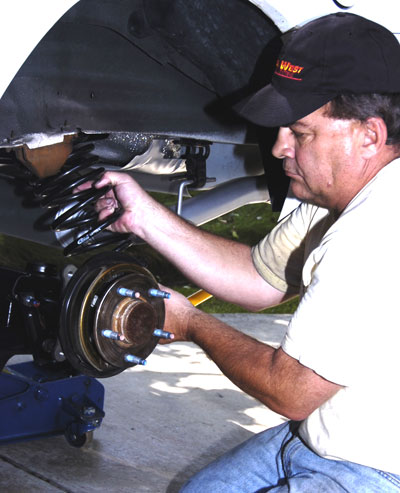
Once the
control arms are in place, set the isolator atop the
spring, then raise the spring, such that its top goes
into the spring seat, then push it onto the rear axle.
Image: CHpg staff.
|
|
 |
|
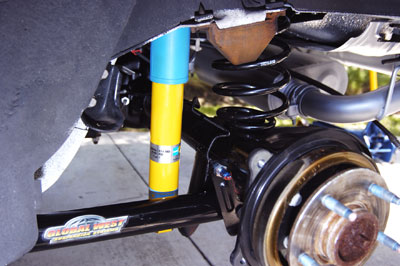
Between the much stiffer
lower control arms and the aggressively-valved Bilstein shocks, the rear suspension
is going to deflect less and better damped. Access the
shocks’ top nuts through the interior. On the bulkhead
behind the rear seat are two carpeted access flaps. Fold
them back, pull out the sponge insulators and there are
the nuts. Once the shocks’ lower bolts are tight, you
can take the rear end off the jacks. Image: CHpg staff. |
|
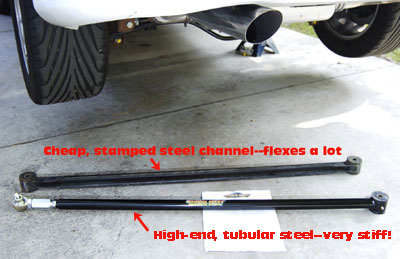
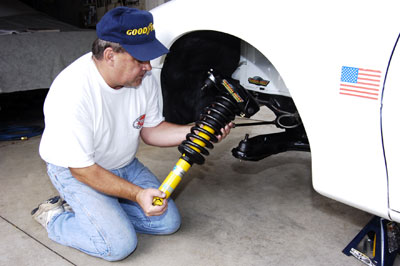
We
bolted-on Quiet Ride tubular steel, rear control arms (PN
TBC14) which fit ‘82-’02 Camaros and offer an increase
in rigidity over the stamped-steel stockers. GW arms use
a Moog, rubber bushing in the body end and a spherical
bearing on the axle end. These arms can be installed in
an hour.
Next,
we ordered Eibach Springs and Bilstein high-pressure,
gas shocks. The rear Eibachs are a stiffer, progressive
rate design, dual-rated at 75 and 135 pounds-per-inch.
They lower the car about 1.5-in. and are part of the
“Pro Kit” (PN
3870.240)
for V6 Camaros. The Bilsteins' (PN
B46-1914) stiffer
damping is an excellent match for our spring rates and
ride height. We added a 19-mm, Z28 rear stabilizer bar.
We used the production Camaro mounts and end links but
installed Global West polyurethane link bushings (PN
19-428).
|
 |
|
Side-by-side
are the stock and Global West trackbars.
The GW upgrade offers an increase in rigidity and is of
value to any modified Camaro, be it an autocrosser or a
drag racer. Image: CHpg staff. |
 |
|
One neat
feature of the Global West Trackbar is that
it's adjustable so the chassis can be centered on the
rear suspension no matter what the ride height. You
loosen the nuts then turn the hex section as necessary
to center the chassis. Image: CHpg staff. |
 |
|
The rear
stabilizer and Global West Trackbar are in
place, so the rear is done, except for centering.
Image: CHpg staff.
|
|
We
finished the rear with a Global West, Quiet Ride
Trackbar (PN PHC3), an improvement over the flimsy,
rubber-bushed stocker. Made of tubular steel with a poly
bushing in one end and a bearing in the other, it’s a
stiffer lateral link so suspension deflection during
cornering is reduced. It’s adjustable for length, so the
body can be centered, regardless of ride height. All
these rear suspension parts came from Tom Henry Racing.
|
 |
|
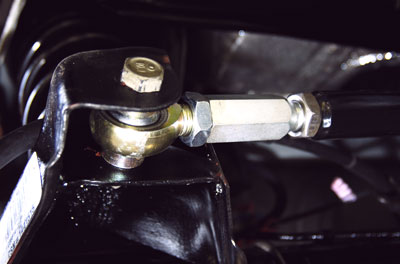
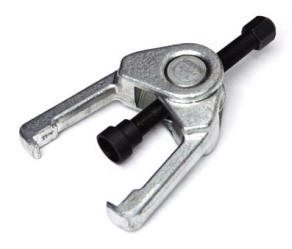
Aftermarket service manuals say to use a pickle fork and
a hammer to separate ball joints and tie rod ends. Not!
That's a lot of work and it renders good parts unusable.
Use a ball-joint and tie-rod removal tool like this
one--it's much easier on you and the parts. Image: CHpg
staff. |
|
On to the front
suspension. We pulled off the front brakes, popped the
ball joints loose then removed the steering knuckles,
the struts and the front control arms. Let's take a
minute to expand upon the subject of polyurethane
suspension parts. "Poly" is common in suspension
upgrades, however, it's not appropriate in all
situations. Urethane is more rigid than rubber so, on a
car with ride travel typical of road cars, when a
suspension nears compression and rebound limits,
urethane can bind suspensions which have control arms
which twist as well as move up-and-down. Examples are
rear bushings in 4th-gen front lower arms or the
bushings in the rear arms. On the street, if you want
reduced deflection, it’s better to use
high-durometer-rubber bushings from the FE7 suspension.
Some may know these as “1LE bushings”, though they were
on cars other than 1LEs. These bushings noticeably
decrease deflection, however, they won't bind the
suspension on street cars nor are they overly harsh.
|
|
We ordered stock, FE7
front lower bushings (PN 22145392 and 22156434) from the
Tom Henry Racing. We, also, ordered Moog’s “enhanced
design” lower ball joints (PN 6145T) which have
pressed-in rather than folded-over bottom plates and
come with grease fittings, both durability and
performance upgrades. Moog is a supplier to NASCAR, so
if they’re good enough for the Busch and Cup guys;
they’re good enough for us.
Both the bushings and
the ball-joints have to be pressed-in. Since we were
ordering the parts from THR, we shipped the arms to Tom
Henry Chevrolet's Service Department and had them run
next door and get the parts, install them and ship the
arms back. Finally, we wet-abraded the lower arms using
Standard Abrasives Medium BriteRite Pads with hot Simple
Green and water. We dried them with shop air then, then
shot them with Eastwood Extreme Chassis Black.
|
|
 |
|
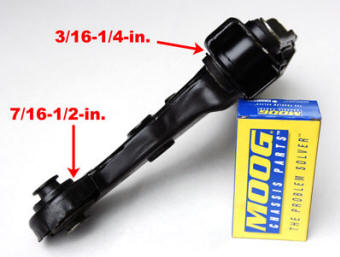
The Tom Henry Chevrolet
Service Department uses an assembly of
J-Tools in a hydraulic press to install
and automatically set the position of
bushings. Their positions in the front
lower arm is critical to avoid
interference between the arm and the crossmember when
the suspension rebounds. You can install bushings using
traditional methods, but you must set them at specific
positions. Push the front bushing in from the rear until
3/16-1/4-in. is left exposed. Push the rear bushing in
from the bottom, until 7/16-1/2-in. protrudes above the
arm. Image: CHpg staff |
|
When
reinstalling control arms with rubber bushings, have the
arms at ride height while tightening the bolts. Bushings
don't rotate, they twist. Tighten the bolts with the
suspension hanging and, when it returns to ride height;
the bushings are constantly twisted. When the suspension
nears full compression, they’ll really be twisted, which
can damage the bushings. Also, with the rear bushing in
the front lower arm of a 4th-gen car, if you tighten the
bolt with the suspension hanging, the bushing may turn
off-axis in the crossmember. If that happens, setting
alignment is difficult, the misaligned bushing can cause
increased harshness and the crossmember and bushing may
be damaged.
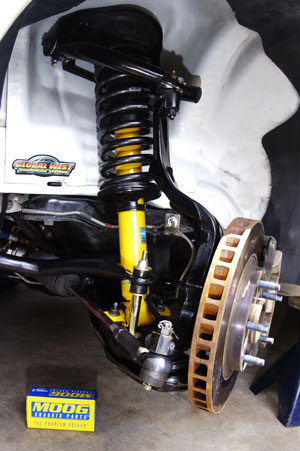
We
disassembled the front strut assemblies, scrapped the
stock springs and shocks then installed the stock spring
seats, 377 lb/in. front springs out of the Eibach Pro
Kit and the stock upper spring mounts onto two Bilstein
shocks (PN B46-1913).
|
 |
|
While
the procedure of using the garage floor
or other flat surface as a "jig" while
assembling the struts seems
all-too-simple--it works very well.
Image: CHpg
staff. |
|
The
Tom Henry service department uses a high-dollar, J-tool
jig in a hydraulic press to assemble 4th-gen front
struts, equipment out-of-reach of most DIYs. You can use
ordinary strut compressors if you orient the shock’s
lower mounting bar and the upper strut mount in specific
positions while tightening the shock absorber nut.
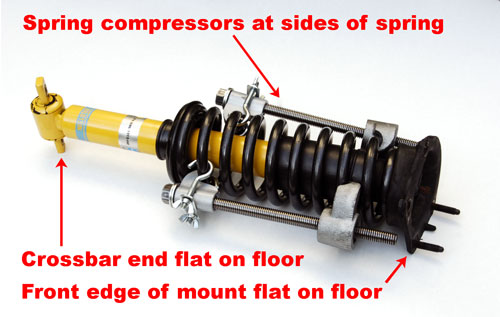
Your
“jig” is your garage or shop floor. Each strut mount has
two threaded studs and a rubber pin near its front edge.
Once the struts are assembled with the springs
compressed, the springs’ upper ends seated in the strut
mounts and the shock absorber nuts loose, lay the struts
with the front edge of each mount flat on the floor.
Rotate the left shock so the end of its lower mounting
bar is flat on the floor and (looking at the strut top)
inclined down to the right (pointed outside the
vehicle). Rotate the right shock so the end of its
mounting bar is flat on the floor with (looking at the
strut top) the crossbar inclined downwards to the left
(pointed outside the vehicle). Now, tighten the shock
nut and remove the spring compressors and you’re ready
to stick your struts back on the car.
|
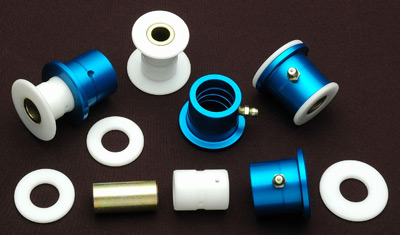 |
|
The Global
West Del-A-Lum is really a bearing not a bushing. The
blue aluminum shell is pressed into the control arm. The
gold steel sleeve rides on the control arm shaft or bolt
and is locked in place. The Delrin sleeve "floats"
between the two. Layers of grease are between all the
parts. Del-A-Lums are a better choice than polyurethane
bushings because they never squeak, do not bind the
suspension and have better durability. Image: Global
West Suspension. |
|
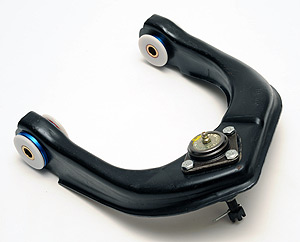
Next,
we had the Tom Henry Service Department install Global
West Del-A-Lum “bushings” in the car's stock uppper
control arms. Del-A-Lums are not really bushings but
Delrin/Aluminum composite suspension bearings. Swapping
the stock rubber bushings for Global's parts eliminate
deflection of the front upper arms under cornering loads
which makes the car's handling more predictable and
consistent. Since the Tom Henry RS is still primarily a
street car, the Del-A-Lums in the uppers and the
production 1LE rubber bushings we installed in the lower
control arms make a great combination. The lower arms
take virtually all the impact loads, so keeping rubber
in those arms allows us to retain a modest level of
compliance to keep impact harshness and noise at an
acceptable level. Since we had the upper arms off, once
the Del-A-Lums were in place we, also, added new, Moog
heavy-duty ball joints (PN K6462) to the arms.
|
 |
|
The OE
bushing (left) and the Del-A-Lum.
Obviously, the Del-A-Lum is a
less compliant, but not quite as
stiff as a solid metal bushing.
The delrin-aluminum composite
design with the parts separated
by grease makes for outstanding
durability. It's not uncommon to
have Global West Del-A-Lum
outlast the car it's on. Image:
CHpg Staff. |
|
|
 |
|
The
THRS's stock front upper control
arms fitted with Global West
parts and Moog ball joints.
Image: CHpg Staff. |
|
|
 |
|
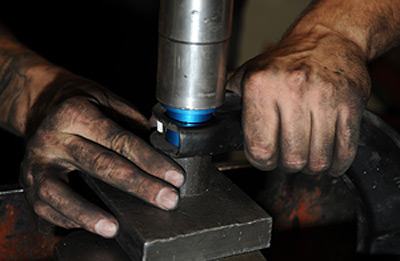
Like
most suspension "bushings" the
Del-A-Lums are best installed
using a hydraulic press along
with a small, temporary "spacer"
to keep the arm from collapsing
when the bushing shell is
pressed into the arm. Image:
CHpg Staff. |
|
We
assembled the arms and the control arm mounting brackets
then stuck the refurbished lower arms, the Eibach/Bilstein
struts, the mod'ed upper arms, the steering knuckles, a
pair of Moog tie rod ends (PN ES3238RL) and all the
brake hardware back on the car.
|
 |
|
The upper arm, its
mounting bracket and the strut are
installed as a unit. Guide the strut
mount studs though the shock tower, hold
the lower control arm down then push the
strut’s lower mount onto the arm. Image: CHpg
staff. |
|
|
 |
|
We
bolted the front brakes in place, bled them and we were
done with the front, except for an alignment. Image: CHpg staff.
|
|
|
 |
|
This is
the SPX Kent-Moore tool which alignment shops should use
when setting the camber and caster on the front of a
4th-gen Camaro. You can do the alignment without the
tool, however you'll end up with the lower control arm
bushings preloaded and that tends to decrease their
reliability-durability. Image: CHpg
staff. |
|
While we're on the
subject of doing the job right, let's talk about tools.
Marketed by SPX Kent-Moore, GMs supplier of service
equipment, specialized tools (Techs at Tom Henry
Chevrolet Service call them “J-Tools”) are sometimes
needed. J-Tools for bushing installation and strut
assembly are not necessary, however, the “Caster/Camber
Adjusting Tool” (J-38658) is required. You can’t adjust
camber without it because you end-up tightening the
bushing bolts with the suspension hanging.
Our front suspension
upgrade ended with a stock Z28, 30-mm front
stabilizer bar from and Global West polyurethane
mounts (PN
19-1146) and links (PN 19-409) from THR. |
|
With suspension mods
done for now, we bolted the Goodyear F1 GS-D3s back on
and took the Tom Henry RS to Tucker Tire for front end
alignment and to center the rear using the GW Track
Bar’s adjustment.
|
|
 |
|
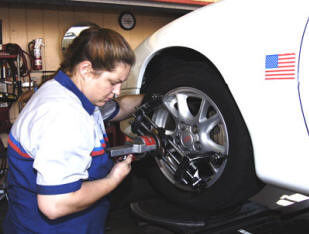
Amanda Dakai, a Tucker Tire suspension technician, works
the camber/caster gauge. Tucker Tire is one of L.A.’s
top suspension centers with four alignment racks running
all day long. Yes, you need a reservation. Image: CHpg
staff. |
|
Just One More Thing
|
 |
|
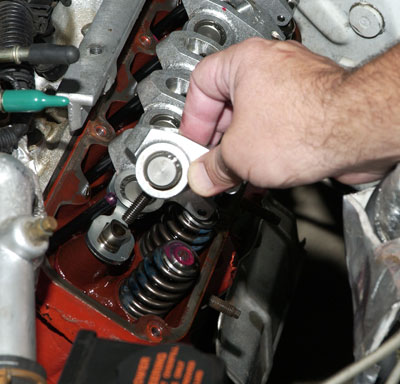
Installing higher-ratio rockers on a 3800 in a Camaro is
fairly easy. You remove the ignition hardware, pull the
valve covers then trade the stock rocker bolts, rockers,
pushrods and support bar for the SLP parts. Image: CHpg
staff.
|
|
The final step in Part
One of the Tom Henry RS project was to install a set of
SLP Performance Parts, 1.8:1-ratio, rocker arms on the
car's 3800 V6. These come in a kit that includes
.300-in. longer pushrods and new GM rocker arm bolts.
Longer pushrods are required because the SLP rocker's
pushrod seat is 3/10th of an inch higher than stock and
the new bolts are necessary because the O.E. units are
"torque-to-yield" fasteners which cannot be reused. |
|
 |
|
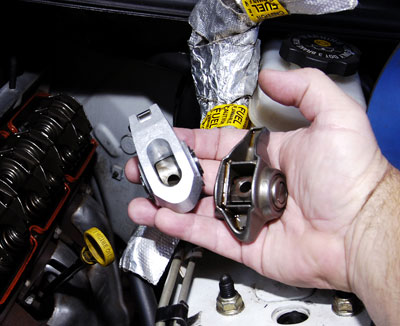
Where as the stock
rockers are investment-cast steel with a
roller fulcrum, the SLPs are machined aluminum
with roller fulcrum and tip. They are about
half-an-ounce lighter. Image: CHpg staff. |
|
|
 |
|
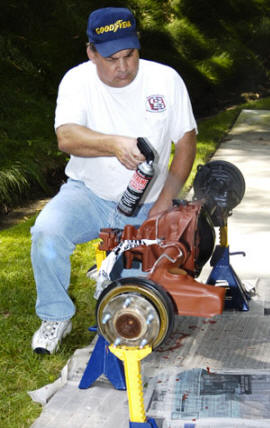
While changing
rockers on our 3800 Series II, we
prelubed the rockers with Red Line
10W30 oil and we dabbed some Red LIne
Assembly Lube on the valve stem tips.
Also, you must replace the rocker
bolts, if you stick with GM bolts. ARP
makes a reusable 3800 rocker bolt
and later in the project, we'll
install a set.
Image: CHpg staff. |
|
|
 |
|
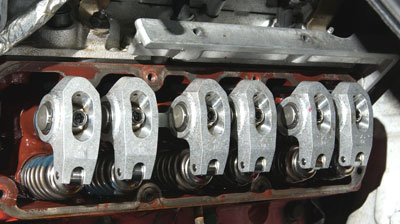
We're almost ready to
put the valve covers back on. We still
need to squirt some Red LIne 10W30, into
the top of each rocker, stick new Fel-Pro
gaskets in the covers then
reinstall them. Then, we'll put the
ignition hardware back on and go
testing. Image: CHpg staff. |
|
The
stock rocker ratio is 1.6:1. Higher ratio rocker arms
offer more valve lift and duration for a given lobe
lift. The stock cam for an unblown 3800 has .256-in.
lobe lift. With that cam, valve lift with stock rockers
is .410" but with the SLP 1.8s, it's .460". Generally,
more valve lift means more air into the engine and more
power out.
Another difference between the SLP 1.8s and the stock
rockers is 0.5-oz. less weight per rocker. In theory, a
lighter rocker taking mass out of the valvetrain should
improve the engine's ability to "RPM", however, right
now, the engine in the Tom Henry RS peaks at 5000 rpm
and we've still got the stock rev. limiter in the ECM
calibration so even if the SLPs do offer an advantage at
high rpm, at this point; we can't use it.
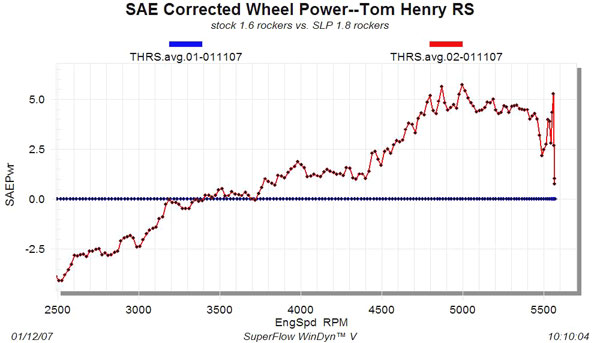
With
the SLP rockers installed, we went back to the chassis
dyno at Westech. In a series of six passes on their
Superflow 840, three with stock rockers and three with
the SLP 1.8s, the results were mixed. At 4900-5000 rpm
we saw just a hair less than a 6-hp average increase,
but below 3400 rpm, we saw as much as a 3.5-hp loss.
This increase up high but a loss down low is typical of
adding both lift and duration. Nevertheless, from
3700-up, there's a consistent increase so, in the real
world, on the street or the drag strip, you might see a
slight decrease in e.t.
|
 |
|
Most of
the time, you see chassis dyno information as curves.
Superflow's software can do a lot of interesting number
crunching. This graph offers a more visual
representation of the improvement that we got with the
SLP rockers. The blue baseline is the average of three
passes on Westech's SF840 before the rockers. The red
graph is the average power improvement below or above
the baseline from three runs with the 1.8 rockers
installed. We don't know why this representation style
is used more often because we think it's a better way.
Image: CHpg staff. |
|
This
particular 1.8 rocker is not available direct from SLP
but is sold by LM Performance. The manufacturer of these
rockers was Yella Terra, an Australian company which
makes performance products for 3800 Series II V6es
(down-under, they call it the "Ecotec 3800") and
private-labeled them for SLP. Once LMPerformance sells
out of the SLP 1.8s, V6 Camaro DIYs will be able to get
to Yella Terra's "second-design" 3.8 rocker which is
available in both 1.8:1 and 1.7:1 ratios. Later in this
project we'll acquire a set of the Yella Terra 1.8s and
test them but, for now, the SLPs work quite well.
We'll
be back in about two months with the second installment
of the Tom Henry RS built-up in which we'll really
roll-up our sleeves and turn some wrenches. We'll start
with cylinder head modifications.
Click here to read Tom
Henry RS Project Part 2
Sources:
All the
GM parts and most of the aftermarket parts discussed in
this article are available from Tom Henry Racing at
www.tomhenryracing.com. The products not available from
THR are listed below:
|
American
Kleaner Mfg.
(Karcher Pressure Washers)
Box 3900
Rancho Cucamonga CA 91729
909.481.4333
www.karcher-usa.com |
Eastwood
Company
263 Shoemaker Rd.
Pottstown PA 19464
800.345.1178
www.eastwoodcompany.com |
|
Haynes
Publications, Inc.
861 Lawrence Dr.
Newbury Park, CA 91320
800.442.9637
www.haynes.com/na.html |
Helm,
Inc.
14310
Hamilton Ave.
Highland Park, MI 48203
800.782.4356
www.helminc.com |
LMPerformance, Inc.
PO Box 534
Destin, FL 32540-0534
850.654.4730
www.lmperformance.com |
SPX Kent-Moore
28635 Mound Road
Warren, Michigan 48092-3499
800.468.6657
www.spxkentmoore.com |
Rockauto
rockauto.com |
Valco
Cincinnati
411 Circle Freeway Dr.
Cincinnati, Ohio 45246
800.788.3865
www.valco-cp.com
|
Vericom
Computers, Inc.
14320 James Road
Suite 200
Rogers, MN 55374 USA
800.533.5547
www.vericomcomputers.com |
Westech
Performance Group
Unit C
11098 Venture Av.
Mira Loma CA 91752
951.685.4767
www.westechperformance.com
|
|