|
Building the Tom Henry RS
Part 5: Brake Service, More Suspension Mods,
Custom Tuning and Making it Pretty
by
Hib Halverson
|
 |
|
Image: CHpg Staff |
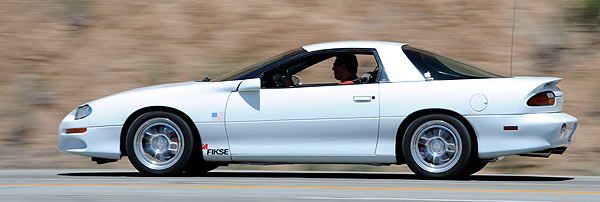
The
Tom Henry RS, 2001 Camaro project car now has a little
over 104,000 miles on it. Many of those miles have been
"daily driver" duty, but for rest of the time, we've
beat on the car pretty hard–close
to a hundred or so chassis dyno runs and plenty of road
testing–so
for this part of the series; we're going to mix
maintenance with modification.
During the camshaft installation covered in Part Two, we
installed a Rollmaster single-row timing chain. For
that, we were criticized by a few "experts" (might they
be "faux experts"?) on forums catering to V6 Camaro and
Firebird owners. They claimed single-row chains are not
reliable in a 3800 Series II with a more radical
camshaft (like Comp Cam with 206/216°
duration, .530" lift), higher spring pressure (Katech
valve springs), higher rocker ratio (1.8:1 Yella Terra
aluminum roller rockers) and a higher rpm range (6400
rpm rev limiter). The
“experts”
said we were foolish to use a single-row chain because
our engine would experience certain failure in short
order.
Installation of double row chains require removal of the
engine's balance shaft. We preferred not to do because
that shaft reduces engine shake at idle and low speeds
which we see as a desirable quality for a street car, so
we stayed with the single-row chain.
Fast
forward–five
years later.
After running the single-row Rollmaster for 50,000 miles–that,
alone, seems a testament to the chain's reliability–we
decided it was high time to put the single-row chain
durability issue to rest. We pulled off the front cover,
inspected the sprockets then compared any slack in the
existing chain to that in a new chain.
The
procedure for replacing a 3800 timing chain was detailed
in Part Two, but to quickly review: Remove the drive
belt, the heater hoses, the belt tensioner, the power
steering pulley and the harmonic damper. The damper bolt
is way tight. Even our 1/2-drive air impact wrench
wouldn't break it loose. I had to brace myself and use
my feet on a Matco 24-in. breaker bar (PN C24FC) to get
the bolt loose. With the bolt out, the damper comes off
with a standard puller, then you remove the crankshaft
position sensor and its harness, lower the front of the
oil pan then get the front cover off.
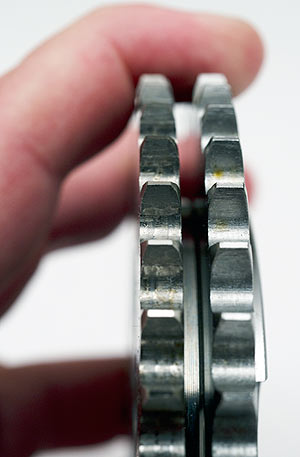
What
did we find after five years and 50,000 miles? Were the
Internet "experts" correct?
Not.
We
removed the chain tensioner and measured the chain slack
with a dial indicator. Then, we removed the sprockets
and inspected them with a magnifier and a bright light.
Only a small amount of wear was visible on the teeth. It
looked more like the slight burnishing you'd get during
break-in. Those sprockets are good for another 50,000
miles, at least. We reinstalled them so as not to skew
the slack measurement of a new chain.
|
 |
|
Left is the cam sprocket
we took out. Right is a new Rollmaster
unit we got from Engine Pro. The wear on
the used part is minor–more
like burnishing rather than real wear on
the teeth. Image: CHpg Staff. |
|
Like
the Yella Terra roller rockers installed for Part Three,
Rollmaster timing sets are made in Australia where
there's a big market for 3800 Series 2 performance
parts. We took a new single-row chain out of a timing
set (PN CS6141) we obtained from Rollmaster's U.S.
Distributor, Engine Pro, and installed it on our
existing sprockets.
|
 |
|
The Engine Pro's
Rollmaster single-row chain set fits
3800 Series II engines and includes oil
pump drive, sprockets and chain.
Image: CHpg Staff. |
|
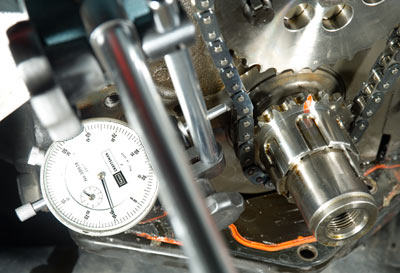
We
could measure no practical difference in chain slack
between the old chain and the new one. With the chain
tensioner removed, chain slack of both measured
0.530-in. give-or-take a few thousandths. Clearly, the
single-row, Rollmaster chains Engine Pro distributes
have excellent durability in a valve train such as that
of the Tom Henry RS's V6. We left the new chain in place
and our used Rollmaster will make an excellent spare.
 |
|
We took chain slack measurements with a
dial indicator. So not to skew the measurements, we used
the sprockets originally in our engine and only swapped
the chains. Slack difference was negligible. Image: CHpg
Staff.
|
Before we put the front cover on, we replaced the chain
tensioner with a new GM unit (PN 24503893), then we
washed parts we were going to reuse in "Extreme Simple
Green Motorsports Cleaner & Degreaser". Since the
service trade is moving to more
environmentally-friendly, aqueous parts washing and it's
slowly catching on in the enthusiast community, we've
been trying Simple Green's Motorsports product for about
a year. It's required a little change in our parts
cleaning habits, but the results have been acceptable in
the majority of parts cleaning situations we encounter.
|
 |
|
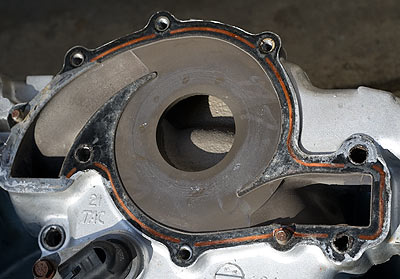
Does periodic cooling system maintenance
pay off? This is the water pump chamber in our engine's
timing cover after a decade and 104,000 miles. There is
no corrosion of any kind. In fact, you can still see the
original coating GM put on the cover. Image: CHpg Staff.
|
We
replaced the coolant pump with a new GM unit (PN
19209288). We added a new front cover gasket out of a
FelPro timing cover set (PN 45971) then reinstalled the
front cover. After that, we installed a new front seal
using a Kent-Moore seal installing tool (PN J 35354).
While it's possible to "knock" the seal in place with a
hammer, the Kent-Moore tool does the job faster and
prevents mangled seals or damage to the aluminum cover.
For
a while, we'd noticed the oil pressure gauge was either
pegged or fluctuating, a sign of the "bad oil pressure
sender syndrome", so we screwed in a new GM sender (PN
19244510). The chain tensioner, the water pump and the
oil sender came from our GM Parts source, Tom Henry
Racing.
The
final major task in our timing chain validation session
was reinstalling the harmonic damper. It's a modest
press fit onto the crankshaft and you pull it on using
the stock damper bolt. Once the damper is on, that bolt
needs to be very tight–111
ft/lbs plus another 114°
measured with a Matco torque angle meter (PN TAG281).
Done by hand, the strength of a body builder is
required. Clearly, I need to spend more time at the gym
because, again, I had to put my feet on the Matco
breaker bar to get 114°
additional torque angle.
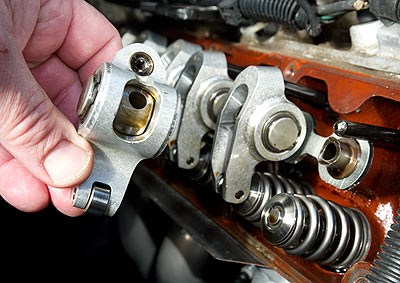
Upper End Service
Some
discount long-term durability of aluminum roller rocker
arms. Our position is that if the design is sound, the
materials are high-quality, the use does not exceed
design limits and there is proper lubrication, after
market roller rockers last a long time. We decided see
if our Yella Terra, Ultralite 1.8:1 rockers, which had
been in place for three years and 38,000 miles, showed
any wear.
|
 |
|
Roller rocker arm. We neither saw nor
felt any wear. The valve stem ends of our Manley valves,
our Katech titanium retainers and Katech valve springs
all looked good. Image: CHpg Staff. |
We
pulled the spark plugs, removed the plug wires, unbolted
the ignition system, then popped off both rocker covers
and removed all the rockers. On the work bench, we
inspected each under bright light and felt how the
trunnion needle bearing and roller tip worked. We could
detect nothing other some modest wear of the pushrod
seats so we reinstalled the rockers, stuck some new
Fel-Pro rocker cover gaskets (VS50080R) in the covers,
bolted them back in place and reinstalled the ignition
system. Since the plug wires had been installed for Part
One of this series seven years and 59,000 miles ago, we
added a fresh set of MSD Super Conductor plug wires (PN
32089) which we like for their high level of RFI
suppression but low resistance. On the plug end of each
wire we use a Design Engineering "Protect-a-Boot" which
is a double-stitched, two-ply glass-fiber "sock" that
goes over the spark plug boot and can withstand 1200°F
direct heat. Protect-a-Boots are great for preventing
thermal damage to the plug boots on engines with
headers. DEI markets these only in sets of two or eight
so we ordered three sets of two in silver (PN 010501).
Since the beginning of the project, we've used Denso
Iridium Power IT-20 spark plugs in our 3800. While Denso
recommends the IT-16, considering its level of
modification and how hard we drive the engine, our
three-eight runs better with plugs one heat range
colder. We prefer Densos because the Iridium Power
design incorporates a small, 0.4-mm center electrode and
a cut-back, u-shaped ground electrode. Both these
features expose more of the combustion chamber's charge
to the spark. The Denso's iridium center electrode has
lower
resistance and better durability than platinum.
We reinstalled our Denso plugs
and pushed the Protect-a-Booted plug wires in place.
|
 |
|
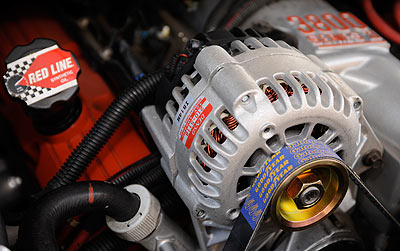
A Denso reman alternator solved our
charge voltage problem and we completed the installation
with a new Goodyear Gatorback drive belt. It's about a
15-minute job to change both. Image: CHpg Staff.
|
Continuing our maintenance, we replaced the alternator.
For a couple of months, we observed an intermittent
problem with high charge voltage and when it's up high,
the voltage fluctuates causing the interior lights to
flicker. Often this is a sign of a bad voltage
regulator, so we replaced the 10-year old, 100,000-mile
stocker with a Denso Remanufactured unit (PN 210-5118)
which solved the problem. We also installed a new
Goodyear Gatorback (4060945) drive belt which we prefer
for its diamond-checked backing which allows the belt to
run cooler and last longer. We were on a roll–wanting
to preempt any starting troubles, we replaced the car's
original starter with a new Remy Gold unit (PN 96211)
obtained from Internet parts source, RockAuto.com, which
we choose for its great web-based catalog, competitive
prices and quick service.
Cooler Cooling
About a 40% increase in power and, once we add nitrous
oxide, a 75% increase, means we need modifications–beyond
the Hypertech 180°
thermostat we'd installed a while back–to
improve cooling.
|
 |
|
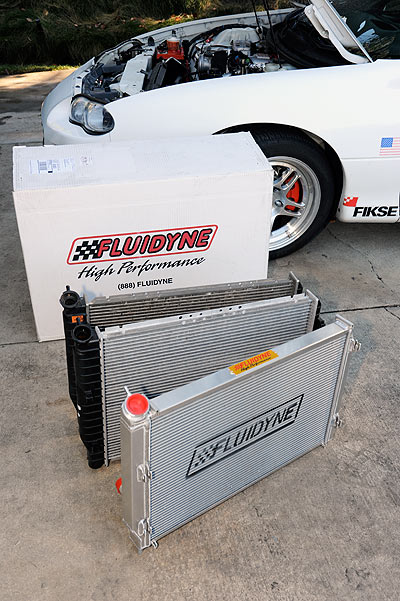
Long overdue for the Tom
Henry RS was an improvement in cooling
performance. On pursuing that, we
compared two aftermarket alternatives.
Image: CHpg Staff. |
We
evaluated two aftermarket radiators capable of better
cooling. The first is a Spectra Premium radiator (PN
CU1485) sold by RockAuto. Like the OE radiator, the
Spectra is a single-row, aluminum-core/plastic-tank
design but it has a 1-in thick core offering an increase
in cooling over a stock 0.625-in. core. This radiator is
for cars with either manual or automatic transmissions.
The Spectra drops right into the stock cooling stack and
RockAuto's price is quite reasonable. In fact, you can
get the Spectra Premium with its thicker core from
RockAuto for less money than an O.E. replacement ACDelco
radiator which has a thinner core. The result? A useful
improvement in cooling performance at reasonable cost.
If you have 3800 modified to the 250-300-hp level,
RockAuto's Spectra Premium radiator makes great sense.
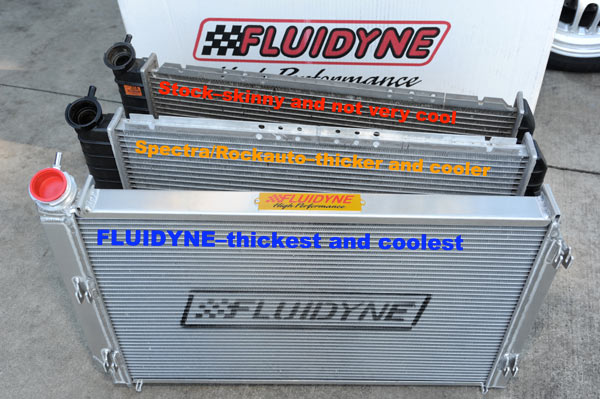 |
|
Rear is the OE V6
radiator. Middle is the Spectra Premium
radiator we ordered from RockAuto.com.
Front is the FLUIDYNE High-Performance
unit. CHpg Staff. |
The
second radiator we tried, capable of an even greater
cooling improvement–but
with an understandably higher price–comes
from FLUIDYNE High-Performance. Some may know FLUIDYNE
as a maker of radiators used in NASCAR racing, but the
company custom builds radiators for modified street,
street/track as well as all-out race cars. It recently
announced an all-aluminum, two-row radiator ideal for
'93-'02 Camaros with V6es having significant
modifications such as, superchargers, turbochargers or
big doses of nitrous oxide.
This
radiator (PN FHP-20-34322-CAMV6) is a serious
piece–incorporating technology FLUIDYNE uses in making
its NASCAR radiators.
It uses the "Thin-Line" core which is a two-row,
1.5-inch, high-fin-count, mini-tube cooler. The
Thin-Line core provides better cooling from: two rows of
tubes, dense fin count and increased water turbulence
inside the smaller tubes. The Thin-Line core is also
very light, resulting in a radiator weighing only
11-pounds. This part is manufactured with the Nocolok,
furnace-brazing process which offers superior
reliability and durability compared to products using
welded construction and epoxy sealing. Typical of most
FLUIDYNE High-Performance products for use in
production-based applications, it drops right into the
stock radiator mounts, accepts the stock electric fan
assembly, stock hoses and offers a significant increase
in cooling compared to the weak-suck, skinny-cored
stocker. This radiator would probably support 450-hp.
|
 |
|
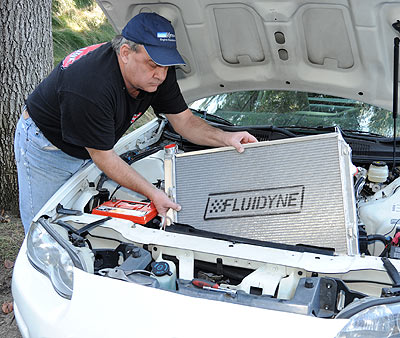
Both the Spectra and the FLUIDYNE bolt
into the stock Camaro radiator mounts and accept the
stock fan assembly and the upper support. Image: CHpg
Staff.
|
This
project car is ten years old, so we scrapped the stock
coolant hoses and finished the radiator installation
with new, Goodyear, radiator hoses (PNs 62153, 62154)
and heater hoses (PNs 63301, 64268, 63906). All that
Goodyear stuff we ordered from RockAuto.
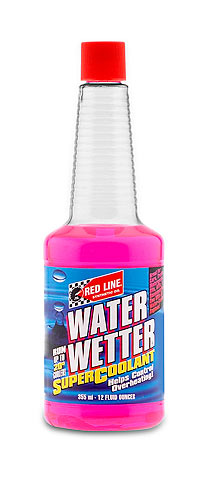
Since we were changing the water pump as well as the
radiator, we started with a dry cooling system which we
filled with a mix of distilled water and a bottle of Red
Line Water Wetter. Since straight water is a better
coolant that 50/50 mixes of water and antifreeze and
because this car is based in the coastal Southern
California where sub-freezing temperatures are rare and
never occur long enough to freeze the coolant, but hot
weather abounds; we run water and Water Wetter for
coolant. While that mix works quite well from a cooling
performance standpoint, there are some limitations:
first, you must change coolant every two years
regardless of mileage. Second you need Red Line Water
Wetter for its package of corrosion inhibiters and
anti-foaming agents which is similar to that used in GM
Dexcool. Third, if the temperature where the car is
parked or stored goes below freezing for more
than a couple of hours, you must add antifreeze.
The combination of either the Spectra Premium or the
FLUIDYNE radiator, distilled water, Red Line Water
Wetter, a Hypertech 180 thermostat and lower fan-on
temperatures in the ECM calibration has the Tom Henry RS
running cooler and with a large cushion of cooling
performance.
|
 |
|
The FLUIDYNE is an
all-aluminum design. It's connections
are in the stock locations and it has
stock type of mounts for the HVAC
condenser and the electric fan assembly.
Image: CHpg Staff. |
|
|
 |
|
Red Line Water Wetter is
mandatory if you use straight water for
coolant. Its main ingredients are 1) a
surfactant, or wetting agent, which
improves heat transfer from the engine's
metal parts to the coolant and 2) a
corrosion inhibitor package similar to
that used in Dexcool. Image: Red Line
Synthetic Oil Corp. |
|
|
 |
|
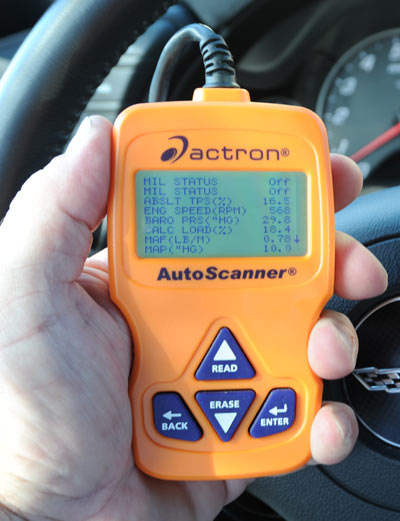
We had occasional
problems with DTC P0128 setting in the
ECM memory. On a temporary basis we
carried an Actron AutoScanner in the
glove box to clear codes when 0128 set.
The little Actron is our favorite
entry-level scan tester. Image: CHpg
Staff. |
In
fact, the FLUIDYNE occasionally is "too good" at
cooling. During winter, code P0128, one of GM's enhanced
diagnostic trouble codes (DTC), sometimes has set our
the PCM. This happens when the PCM decides the engine is
taking too long to warm-up. This code is one of the odd
DTCs which does not turn on the check engine light, but
when it sets, the temperature gauge goes to zero and the
cooling fans stay on.
This
problem occurs on cold days, after a cold start followed
soon after, by highway driving. The high cooling
airflow, coupled with the FLUIDYNE's cooling ability,
has the engine warming up too slowly and that causes the
system to flunk the diagnostic test and set the code. We
carry an Actron "AutoScanner" (PN CP9575) in the glove
box. While it only displays generic OBD II codes, this
handy little scanner can erase any code in the ECM. The
first couple of times P0128 set, we used it to clear
codes. Later, in this article we’ll
reprogram the ECM such that this code won’t
set.
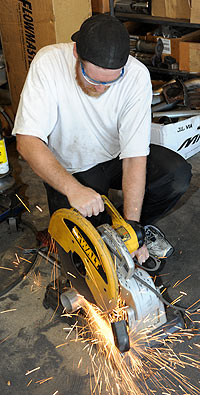
Restriction Reduction
The
exhaust system on the Tom Henry RS was one of the first
modifications we made and its Flowmaster "American
Thunder" cat-back has worked quite well. The system has
been on the car since 2004 and after seven years, it was
rusting in a few places and its silver paint was a bit
natty. We pulled the system off and sent the parts to
Extreme Performance Heat Coatings in Oxnard, California
to have them grit blasted then coated with Extreme’s
“Cermachrome”
which is a durable metallic-ceramic material with
chrome-appearing finish. We reinstalled the system then
admired the brilliant, Extreme-coated, Flowmaster parts.
As
cool as it looked, one thing bugged us about the car’s
exhaust: while the Flowmaster system has 3-inch pipe
back to the muffler, the S-bent section between the
catalytic converter and catback’s
inlet is 2 1/4-in pipe. To get rid of that restriction
required a new, three-inch S-pipe and the folks at
Flowmaster were kind enough to make the pipe for us.
Because the car has 100K+ miles on it and the stock
catalytic convertor's case was damaged, we, also, wanted
a new cat from Magnaflow. This replacement unit (PN
46006) is legal for sale in California. We took the
larger diameter S-pipe and the new cat to Big John's
Performance, an exhaust system specialist in Valencia,
California, and had its ace fabricator, Steve Munson,
install both.
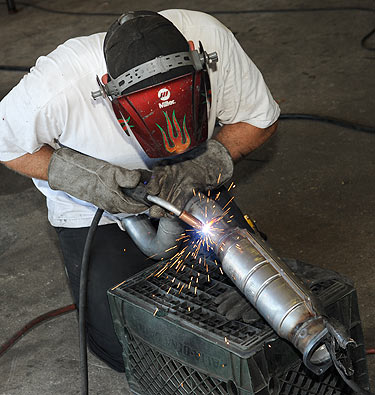
 |
|
At Big John's, first step
was to cut some short sections of 3-inch
tubing which would be used to connect
the S-pipe and the cat. Image: CHpg
Staff. |
|
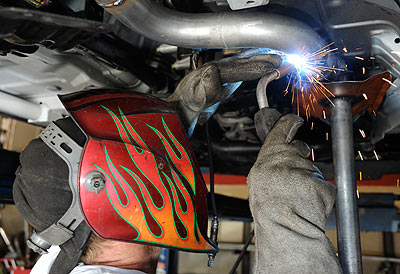
 |
|
The
catylitic converter is a "universal fit"
pare, so welding is required and having
an experienced exhaust fabricator, like
Steve Munson, doing the work, ensured
the S-pipe installation and the cat
replacement were done right and in a
short about of time. Image: CHpg Staff. |
|
|
 |
|
Once the S-pipe/cat
assembly was tacked in place, we checked
alignment and clearances of the entire
exhaust. Then, Munson did the final
welding. Image: CHpg Staff. |
|
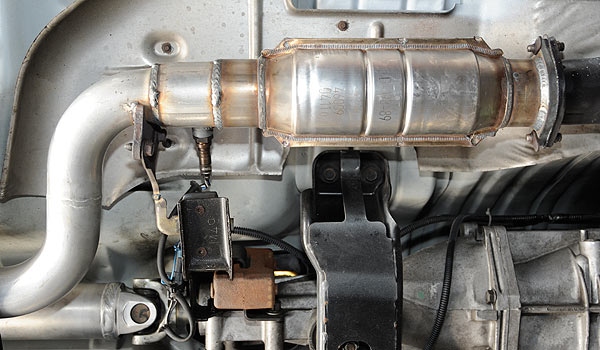 |
|
With the welding done, we
bolted the cat to our Y-pipe, installed
the rear oxygen sensor and reinstalled
the center exhaust hanger. Thanks to Big
John's Performance for a job well-done.
Image: CHpg Staff. |
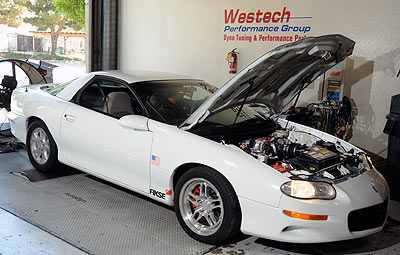
We
returned to the Westech Performance Group for another
session on its Superflow AutoDyn chassis dynamometer.
Three more runs on the AutoDyn showed that, compared to
our last visit to Westech for Part Four, performance
increased by an average 4.5-rwhp and 5.5-lbs/ft
rear-wheel torque in the mid range and
3.6-rwhp/3.4-lbs/ft at high rpm. Our best run with the
new S-pipe and cat was 223.3-rwhp@5780-rpm and
218.4-lbs/ft@4630-rpm. There was another benefit of the
3-in. S-pipe and new cat: the THRS sounded even better
than before–the
sound was deeper and a little louder.
|
 |
|
After the exhaust work, we had the Tom
Henry RS back at Westech Performance Group to validate
the lower-restriction S-pipe. It was worth about 4.5
horses–more
than we expected. Image: CHpg Staff.
|
 |
|
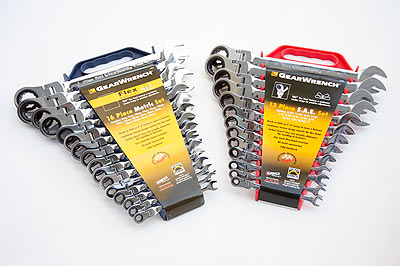
Some of the tools we come
to use a lot working on the Tom Henry RS
are Gear Wrenches. We were familiar with
Gear Wrench but just never got on the
bandwagon until lately. Now that we've
used them, we don't know how we got
along without them. In fact, nowadays we
hardly use our traditional combination
wrenches. We have two sets of the
flex-head, ratcheting combination
wrenches, metric and SAE. All use Gear
Wrench's ratcheting box-end which needs
as little as 5
to turn the fastener before it can be
ratcheted. Their serrated beams allows
us to feel which way to pull. The
flex-head tilts up to 90
each way and the flex-head has
adjustable tension using a set screw.
Each set comes in a handy
storage/carrying rack. We love these
Gear Wrenches. Image: CHpg Staff. |
Click for
Page 2 ->
|