|
Building the Tom Henry RS
Part 5,
Page2
Brake Maintenance and Upgrade
In a
testament to the durability of stock GM brake pads–or
maybe it's that we're easy on brakes–we
went 10 years and 100,000 miles on the car's original
binders. Though the pads had adequate thickness and
there were no apparent problems elsewhere, as a
preemptive move; it was time for brake service. We also
wanted to repaint the calipers using an Eastwood Brake
Caliper Paint Kit (PN 11838 Z). We did this before but
decided, after six years, to do it again because, in
spots, the paint was chipped or flaking.
|
 |
|
The Eastwood Brake Caliper Paint Kit works quite
well–except
for those sponge "brushes". The adhesive which holds the
sponge to the handle is dissolved by some of the
substances one might use to clean them after use. We
went to Ace Hardware and buying some real paint brushes.
Other than that, we love Eastwood Caliper paint,
but...proper surface preparation is required if you want
the paint to really stick. We learned the hard way that
cleaning and painting the calipers on the car doesn't
work real well. Image: CHpg Staff. |
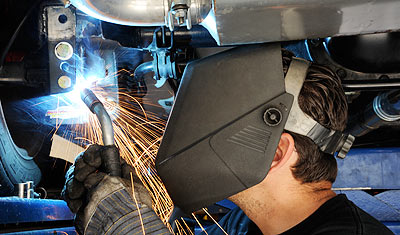
With
the car on stands and the wheels off, we started at the
front by cleaning the suspension and brakes with our
Karcher Pressure Blaster and Simple Green "Heavy-Duty
Cleaner and Degreaser", a product designed specifically
for warm water pressure blasters. Next, following
instructions in the 2001 Camaro Service Manual, we
removed the brake calipers and pads, rotors and front
hubs.
|
 |
|
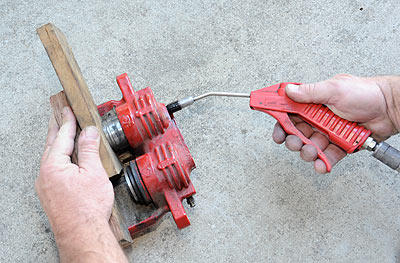
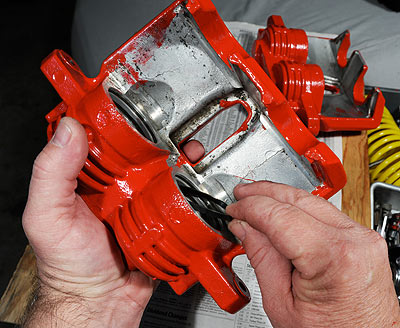
To get the pistons out of the front calipers, we
used a "two-step" block of wood and then turned the
regulator on our compressor way down and applied air
pressure very carefully, just enough so the pistons
gently "popped" out of the calipers. Image: CHpg Staff. |
When
you tear the calipers down, safely remove the pistons by
putting a short section of 2x4 between the caliper
piston bores and the outside brake pad mounting surface
then use air pressure to push the pistons out. You can
use two pieces of wood in a stepped arrangement to make
it easier get both pistons out. Keep your fingers out of
the way and apply air pressure slowly from a blow gun
you can control easily. When they pop loose, the wood
keeps them from shooting across the shop.
We
washed the calipers with Simple Green Motorsports
Cleaner and Degreaser and scrubbed the really dirty
spots with Norton Bear-Tex, a woven abrasive, general
purpose hand pad. We inspected the bores and found them
to be like new, a testament to our periodic flushes of
the brake system since '01. With modern brake calipers,
since they have piston seals stationary in the caliper
bores, honing is unnecessary. If there's light corrosion
or scale in the bores, it can be removed with some fine
sandpaper or a Bear-Tex pad.
When
we blew the calipers dry, more of the original paint
flaked away. The first time we painted the calipers, we
did it on the car. As a result, our preparation
insufficient. Since the first painting didn't adhere
well, washing, then blowing dry made the problem worse
by lifting more of the paint.
|
 |
|
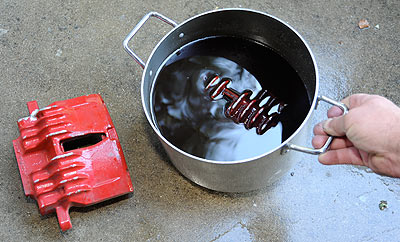
The Eastwood Powder Coat and Paint Dissolver
takes a while to work but it does a good job if you
scrub the toughest spots with a parts brush. It's a
little stinky, so we did the work outside. Image: CHpg
Staff. |
Now,
we had to get all the paint off and, for that, we used
Eastwood Company's "Powder Coat and Paint Dissolver". We
filled a two gallon pot with it, dropped the caliper in
and, with occasional agitation and a little scrubbing
with a parts cleaning brush, let the Dissolver work for
about four hours per caliper. The Dissolver is
water-soluble and washes off. Next, we scrubbed the
calipers in Simple Green Degreaser, again, rinsed them,
then blew them dry.
|
 |
|
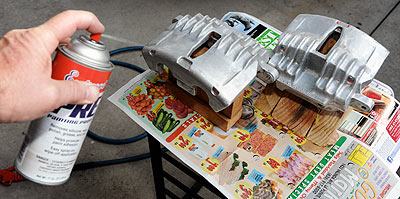
After using the Dissolver then washing the
caliper castings with Simple Green and water, we sprayed
them down with Eastwood's "Pre" and wiped them down. Pre
is a great surface prep for just about any automotive
parts painting task.
Image: CHpg Staff.
|
Next
we sprayed the calipers with Eastwood's "Pre", a surface
preparation product, then gave each one final wipe down
with one of the Kimberly-Clarke Wypalls we like to use.
We mixed the caliper paint and hardener per its
instructions. Once the hardener is added, the paint has
a relatively short "cup life" so some planning is
necessary. Do the calipers two at a time. Have them
ready to go before you mix the paint. Give them one
coat, then put the paint in the refrigerator and wait
45-60-minutes then give each a second coat. The faster
you can paint, the better but, keep in mind that if you
go too fast, you'll make a bit of a mess so put some
newspaper down. You may find it easer to mix the paint
in a smaller quantity but that makes measuring the
hardener difficult with the large cup Eastwood puts in
their kit. We suggest one of those tiny plastic
measuring cups which come with some cough medicines and
a smaller four or six ounce mixing cup.
|
 |
|
We did the caliper painting in two stages, rears
first, then fronts so we mixed two separate batches of
the paint. We gave each caliper body, two coats. Image:
CHpg Staff. |
The
best way to apply this coating is with a small paint
brush. A conventional brush with bristles rather than
sponge works better. We gave each caliper two coats of
Eastwood's Red Caliper Paint. We hastened the hardening
process by baking them in the oven for 45 minutes at 250°F
then let them cool overnight.
The
caliper guide pins and the guide pin bores in the
caliper mounting brackets must be cleaned of all grease
residue. Gun cleaning brushes work well for that. We
cleaned the exterior of the mounting brackets with some
more Simple Green Motorsports Degreaser, dried them,
then painted them with a couple of coats of Eastwood’s
Silver High-Temp Coating (PN10396 Z)
Finally, the pistons must be cleaned and ours required
little more than a wipe down with some brake cleaner and
a wipe dry using a Wypall. If your pistons are dirty,
under no circumstances should you use abrasives to
clean them. If you can't clean the pistons with
non-abrasive methods, replace them.
|
 |
|
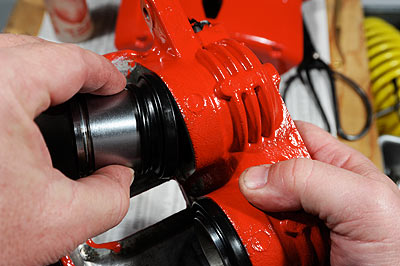
Once the paint dried, we wiped the piston bores
and installed the piston seals out of the GM rebuild
kits. Shown are the front calipers. Assembly of the rear
calipers is similar. Image: CHpg Staff. |
|
 |
|
Next, we installed the boots, smeared some brake
assembly lube on the pistons then pushed them in place.
Image: CHpg Staff. |
|
 |
|
Once all the pistons were installed, we bolted
the caliper mounting brackets to the calipers. The
caliper guide pin bolts must be torqued 23 ft/lb. Image:
CHpg Staff. |
|
 |
|
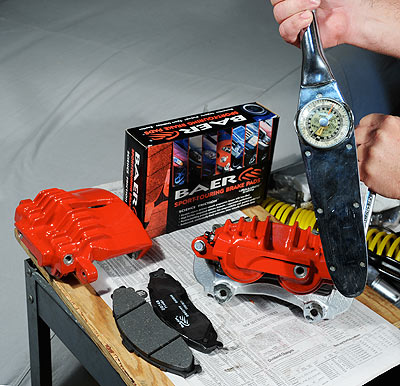
The final step was to load the calipers with our
Baer brake pads then set them aside for later
installation on the car. Image: CHpg Staff. |
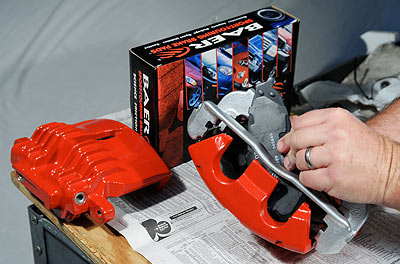
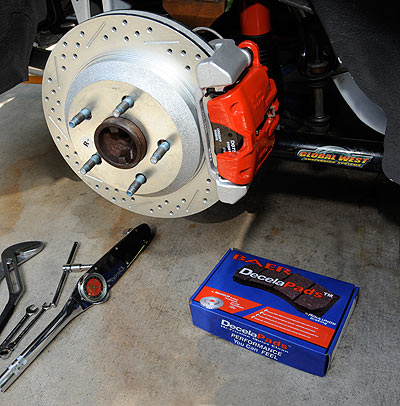
The
next step was to assemble the brake calipers using GM
Caliper Repair Kits (PN 18026160, front, four required,
and PN12530687, rear, two required) sourced from Tom
Henry Racing. First, apply brake assembly lube to the
caliper bores, the pistons and the seals. Put the piston
seals in the bores. Install the piston boots on the
pistons and push the pistons into the calipers. Assemble
the calipers and mounting brackets by smearing silicone
grease on the guide pins and installing new pin boots
and guide pin bolts out of the repair kits. The last
step was to install the two pad abutment shims and an
anti-rattle spring then load each caliper with Baer
"Decelapads" (PN D0749, front and D0750, rear). We
selected Decelapads because they're a good choice for
the high-performance street duty cycle.
|
 |
|
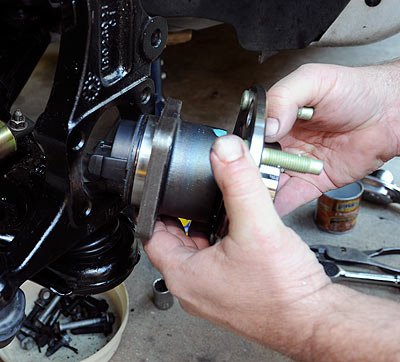
After 104,000 miles, on "GP" we decided to
install two new front hubs. We kept the old ones as
spares. We ordered two ACDelco aftermarket units from
RockAuto.com. Installation was as simple as
disconnecting the ABS wire, unbolting the old, bolting
on the new and reconnecting the ABS. Image: CHpg Staff. |
|
 |
|
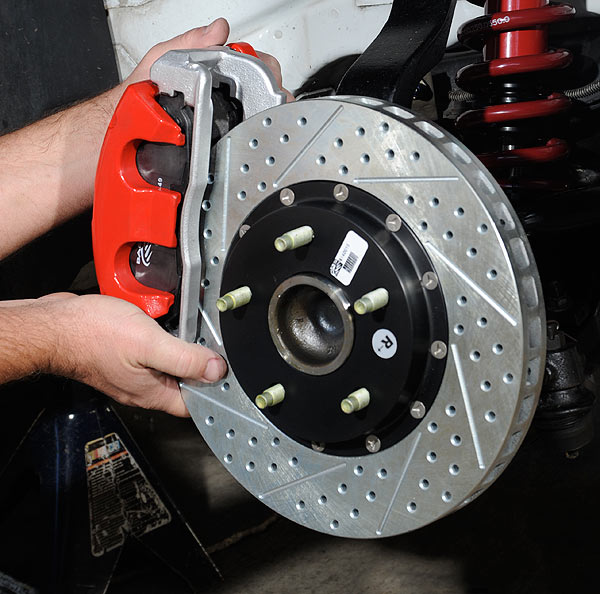
Following the new hubs, we installed our
Baer two-piece rotors and our rebuilt/repainted calipers
and new Baer brake pads. Image: CHpg Staff
|
In
the front, we installed two, new, AC Delco wheel
bearing/front hub assemblies (PN 2086) from RockAuto.com
followed by a fresh pair of Baer Eradispeed-Plus brake
rotors (PN 2301006). These are a racing-style, two-piece
combination of an aluminum "hat" and a bolt-on, grooved
and drilled cast iron brake disc. Eradispeed-Plus rotors
have an enhanced vane design for improved brake cooling
and are made with premium materials. The final step was
caliper installation with Valco Cincinnati Medium
Strength Thread Locker applied to the caliper bracket
bolts and the bolts torqued to 74 ft/lbs.
|
 |
|
In the rear, we went for Baer's Eradispeed
rotors along the Deceapads. Image: CHpg Staff. |
At
the rear, the caliper rebuild and painting process is
similar to what's covered above in the discussion on
front brakes. Once the calipers and rotors are removed,
inspect the parking brake hardware. If the shoe assembly
is worn, replace it. Disassemble and clean the brake
springs and adjuster.
We
installed two Baer Eradispeed (PN 55050-020) one-piece
grooved and drilled rotors. Our repainted rear calipers,
loaded with the Baer pads, went on next. The caliper
bracket bolts were cleaned, the threads given a couple
of drops of Valco Cincinnati Medium Strength Thread
Locker then torqued to 74 ft/lbs.
With
the calipers and rotors in place, we moved on to the
master brake cylinder. At this writing, mid-September,
2011, the master cylinder repair kit for '98-'02 Camaros
(PN 18029859 or ACDelco PN 175431) has been discontinued
by General Motors and is no longer available from Chevy
dealers, however, the ACDelco version of this part (PN
175-431) is still sold by RockAuto.com. Our research
showed that in spite of listing the part as
"discontinued" GM still had stock of this part in its
Lansing, Michigan warehouse. We suspect RockAuto will
continue to sell this until the stock is exhausted. Once
the repair kits are gone, if you have a faulty master
cylinder; your only choices will be a new cylinder from
GM or a new or remanufactured cylinder from the
aftermarket.
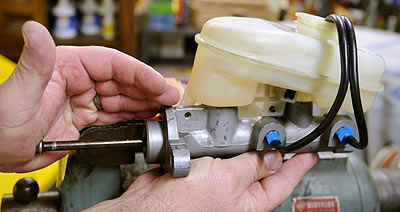
If
you're one of the lucky ones who can get a repair kit–to
service the cylinder, chuck its mounting flange in a
vise and release the reservoir by knocking out the
roll-pin retainers. Depress the piston assembly with a
round-ended tool, remove the retainer, then pull out the
primary piston assembly. Cover the inlets and the rear
outlet then apply low pressure air to the front outlet
to push out the secondary piston assembly and the return
spring.
Clean the interior and exterior of the cylinder with
denatured alcohol then inspect the cylinder bore with a
bright light. If you see cracks, scoring, corrosion or
pitting, scrap the cylinder and get a new one. The bores
in aluminum master cylinders cannot be honed. If the
secondary piston hardware is damaged or corroded you,
also, must replace the cylinder.
Our master cylinder's bore and secondary piston were in
good condition. Knowing we were going to do a brake job
on a car with 104,000 miles, luckily, we had ordered a
GM repair kit earlier in the year from our GM parts
source Tom Henry Racing. We used its contents to
replace the secondary piston seals and seal retainer
then reinstalled the secondary piston. We followed that
with the new primary piston assembly included in the
repair kit. Finally, we reinstalled the piston retainer
and the reservoir.
|
 |
|
When you start with a dry master cylinder,
you must bench-bleed the cylinder before bleeding the
rest of the brake system. We used one of Dorman's Bench
Bleed kits which we got from RockAuto.com. Image: CHpg
Staff. |
|
 |
|
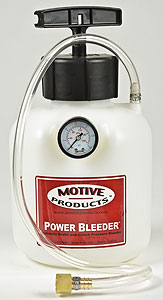
A recent acquisition in our shop is one of these
Motive Power Bleeders. This unit is ideal for DIYs who
do frequent brake work but are not working in a service
trade environment. The Power Bleeder is simple to use
and the model we have includes adapters to fit the
master cylinders of many Camaros and other GM vehicles.
Image: CHpg Staff. |
|
A
rebuilt or new master cylinder must be bench bled
before reinstallation. Use either either a Cardone (PN
105000MCB) or Dorman (PN 13911 for metric and SAE or PN
13999 for metric only), bench bleeding kit, both of
which are available from Rock/Auto. Once it's
bench-bled, reinstall the cylinder per the Service
Manual.
The
last step in our brake work was to flush and bled the
system using a Motive Products "Power Bleeder Kit" (PN
0254) which is designed specifically for GM vehicles. We
like the Power Bleeder for its small size, that it fits
many GM vehicles back to the late '60s and that it
provides the same results you'd get from a
professional-grade pressure bleeder at less cost. Added
benefits are the Power Bleeder's convenient size and
light weight. We, also, like the product's clever
design, originally done by a DIY enthusiast and that the
company's current owners are also DIYs. Using the Motive
Bleeder, we bled the Tom Henry RS's brakes per the
instructions for pressure bleeding in the 2001 Camaro
Service Manual and that included using a Bosch
Mastertech scan tester to "re-home" the motors in the
ABS brake pressure modulator valve.
|
Additional, more specific information on '98-'02 Camaro
brake service, consult the Camaro Service Manual.
New
Suspension Mods
One
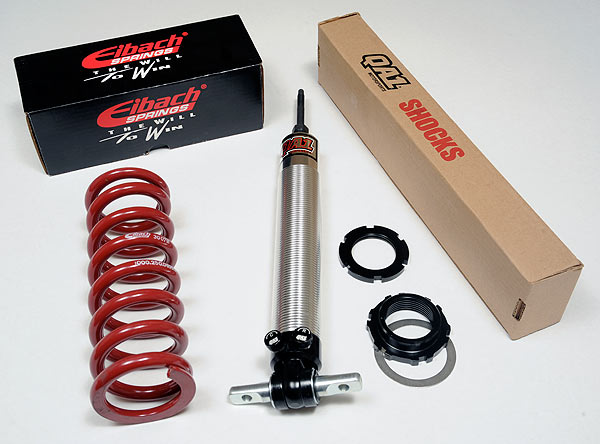
goal we had for Part 5 of the THRS project was taking
our Camaro's suspension to the next level. After consultation with
Doug Norrdin, owner of one of our suspension sponsors,
Global West Suspension, we decided to try a new
spring/shock package consisting of: 600-lb/in. Eibach
front springs, Global West 190-lb/in., constant-rate,
rear springs and QA1 double-adjustable shocks. In the
front, Global West groups the Eibach spring and QA1 "DA"
shocks along with some additional parts of its own
design, into a coil-over-shock assembly (PN CO32-SR).
The rear shocks are a stand-alone, QA1 pieces (PN
TD704).
There are a number of advantages to the QA1s, the first
being, by virtue of the QA1s' aluminum shock bodies, a
slight decrease in unsprung weight over the Bilsteins we
ran before. Shocks which are separately-adjustable for
both compression and rebound simply by turning dials on
their exteriors have great appeal on a car like ours
which is, at various times, street-driven, driven hard
on twisty roads or run on a drag strip. The QA1 Double
Adjustable front shock for 4th Gen F-cars is a
coil-over-shock design so it, also, offers
easily-adjustable, front ride height.
|
 |
|
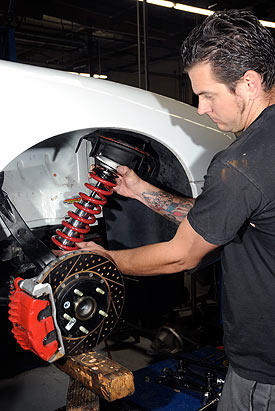
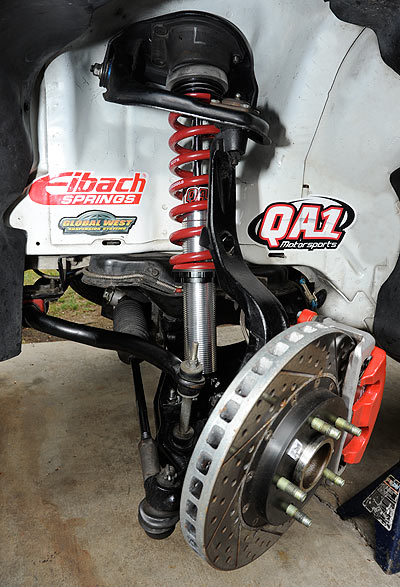
Our revised front suspension uses a Global West
coil-over-shock assembly. Key parts of that are Eibach
Springs and QA1 Double-Adjustable shock absorber. Image:
CHpg Staff. |
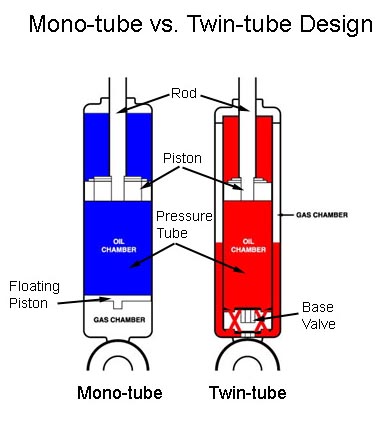
In
the past, the shocks we've used have been "monotube" gas
shocks, however, QA1's are twin-tube gas shocks.
Both monotube and twin-tube designs use gas pressure to
inhibit the shock oil's tendency to foam during severe
duty. Monotube shocks use an inert gas at relatively
high pressure on the opposite side of a floating piston
to keep a constant volume of oil in the shock body as
the piston adds and subtracts volume when it moves. To
achieve the same end, twin tube shocks use inert gas at
a lower pressure inside a flexible containment envelope
or "bag" located between the inner and outer shock
tubes.
|
 |
|
Image: QA1 Motorsports. |
One
drawback of high-pressure monotube shocks is the gas
pressure. Let's say the shock is pressurized to 80 psi
and has a piston area of 3.1 sqin. That adds 250-lbs to
the spring rate on compression. As Roger Wilson, QA1
Motorsports' Sales Manager told us, "This causes the
nose of the car to push upward going over a rise or bump
at road speed rather than the vehicle following the
contour of the road as much as possible. The QA1 gas
bagging method exerts no rod or piston pressure as the
shock begins its rebound stroke so the vehicle nose more
closely follows the road, which enlarges the tire
contact patch and enhances control characteristics."
"The
shock adjustments control the amount of fluid which
passes through the base of the shock." Wilson
continued. "Damping authority increases as the
adjustment valve is closed. A single adjustable model
increases or decreases rebound and compression
simultaneously as the knob is turned clockwise or
counterclockwise. A double adjustable model separates
the rebound and compression adjustment and allows
adjusting the shock from, say, a 90/10 to virtually just
the opposite.
"The advantage of a double adjustable is the enormous
versatility–from
a competition-ready drag shock to a shock with a level
of control appropriate for road racing or autocrossing
and to even a smooth, controlled ride for daily driving–available
from the same shock."
Some
believe aluminum-bodied shocks are not as durable in a
street application as are more common, steel-bodied
shocks, however, QA1 Motorsports uses 6061 aluminum
heat-treated to the T6 specification and shock pistons
having bronze-impregnated Teflon sealing bands. Both
features make a QA1 shock quite long-lasting.
Additionally, the twin-tube design is less vulnerable to
external damage which would render a steel monotube
shock unusable.
For
the chassis mods in this part of our series, Global West
volunteered its installation work at its facility in San
Bernardino, California. First Global's guys removed the
rear springs, shocks and track bar. Eighteen months ago,
for Part Four of this series, we installed GW's Track
Bar Kit and noted an improvement in the car's handing,
especially on corner exits.
Since then, Global West developed an Upgrade to its
Track Bar which makes it even stronger and more
adjustable. Global West upgraded us to the new design
(PN PHC-32K) which further stiffens the track bar
mountings and adds three height adjustments which enable
the user to tune corner exit traction. Whereas the basic
Global West Track Bar is a bolt on, this Upgrade is not.
Extensions have to be welded to the track bar brackets
on the underbody structure and on the rear axle.
Global's Eric Norrdin did that work for us.
|
 |
|
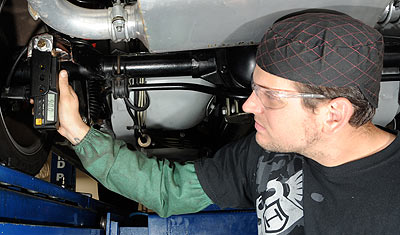
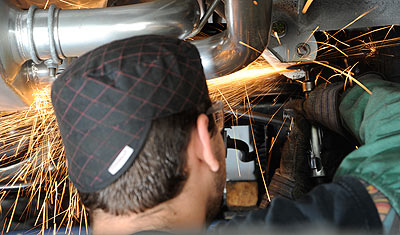
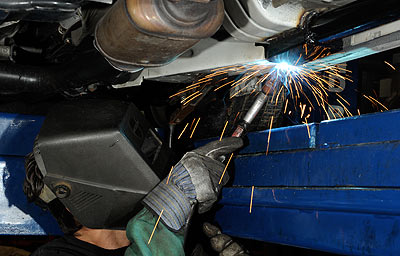
Installation of Global West's Track Bar upgrade
requires accurate positioning of the parts prior to
welding. Eric Norrdin used an angle measuring device to
make sure the bracket to be welded to the rear axle will
be perpendicular to the ground. Image: CHpg Staff.
|
 |
|
An intermediate level of arc welding experience
is required to install the Track Bar upgrade's brackets.
A wire-fed welder makes the process easier. Image: CHpg
Staff
|
 |
|
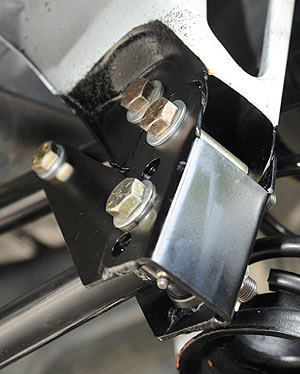
The upgrade includes this brace which reinforces
rear axle track bar mount. Image: CHpg Staff. |
|
 |
|
On the other side of the car, part of the stock
bracket is cut off. The new bracket will be welded
in place of the material removed. Image: CHpg Staff. |
|
 |
|
The Global West Track Bar body mount is
a more robust structure necessary reduce deflection of
the underbody structure under loads applied by the
Track Bar to the vehicle structure during hard
cornering. It also is required for the height
adjustment. Image: CHpg Staff.
|
|
 |
|
Also part of
the upgrade is a stronger track bar
bracket brace made of 1.250 diameter,
0.125-wall thickness, DOM, mild, tubular
steel. This stout piece bolts into the
stock brace mountings on the left and to
the newly fabricated mount on the right.
The more robust mounting brackets,
heavier brace and beefy Track Bar make
the Global West Track Bar system far
stronger than OE parts. Image: CHpg
Staff. |
|
|
 |
|
While
variable rate springs used by GM and
some aftermarket suppliers offer
improved ride when the car is lightly
loaded, a constant rate Global West
spring offers more consistent handling
balance when the car is driven hard near
its cornering limits and better control
of the rear axle under hard
acceleration.
Image: CHpg Staff. |
|
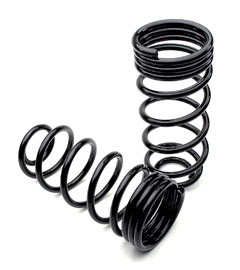
Global West folks installed a pair their
rear springs (PN SA40) which are unique in
the industry for having three coils right at
the top which are wound in coil bind. This
gives the user a way to cut the spring to
adjust ride height without changing the
spring rate. A Global West rear spring can
be cut as much as three inches without
changing its rate. Global's owner, Doug
Norrdin, test-fitted our rear springs, then
cut 1.5 coils off them and reinstalled them.
Our rear ride height is virtually the same
as before. Next to go on were the QA1 rear
shocks. Doug, installed them and set them
with a baseline adjustment of : 4-clicks,
compression, and 6-clicks, rebound.
|
 |
|
The best way to shorten a coil spring is with a
cut-off wheel. Here, Global's Doug Norrdin shortens one
of our rear springs a coil-and-a-half. Norrdin's
experience shows as that was the perfect length for the
ideal rear ride height of a car in a street performance
duty-cycle. Image: CHpg Staff.
|
|
|
 |
|
With the Track Bar brackets and brace installed
and the rear springs cut to the correct length, the next
steps were to install the upper spring seats, the
springs and reinstall the Track Bar. Image: CHpg Staff.
|
|
|
 |
|
The installation of the QA1 double-adjustable
shocks is the same as a stock item. Before putting them
in place, Doug Norrdin set their adjustments at 4C6R.
Once they are on the car, the adjustment is as simple as
jacking up the back, supporting it safely then turning
the knobs at the bottom of the shock. Image: CHpg Staff. |
|
|
 |
|
The final rear suspension task was to
center the body using the Track Bar's
length adjustment. Global West uses a tool they built
which indexes off the wheel rather than the tire making
the adjustment more accurate. |
|
 |
|
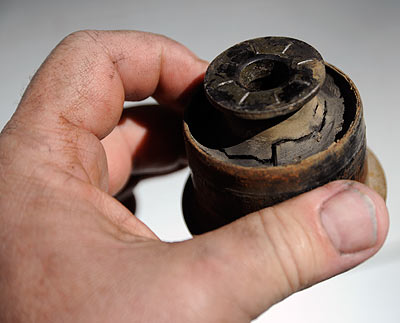
One of the weaknesses of
the 4th Gen Camaro front suspension is
the rear bushing in the front lower
control arms. They have a short service
life on cars capable of high lateral
grip and which are driven hard. In our
case this was our second set which went
five years and a little less than 50,000
miles. GM no longer services the
high-performance 1LE bushings, but Moog
sells the same part in its bushing kit (PN
K6490). We ordered two kits from
RockAuto.com and replaced the rear
bushings in both arms. Image: CHpg
Staff. |
|
 |
|
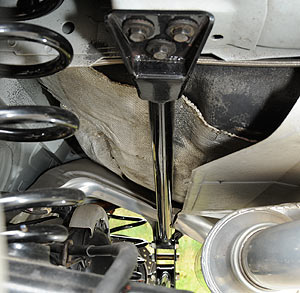
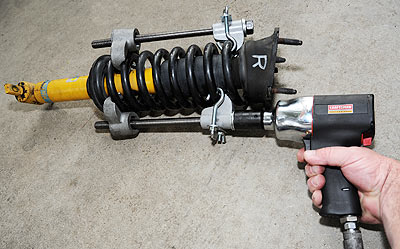
The next step was to remove and
disassemble the front shock/spring assembly. If you do
this yourself, make sure you use the proper spring
compressors. Failing to do so risks injury or death if
the shock/spring unit is disassembled improperly. Image:
CHpg Staff.
|
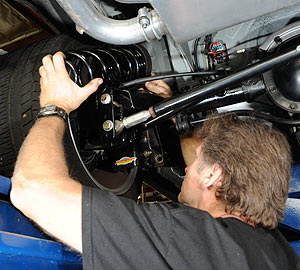
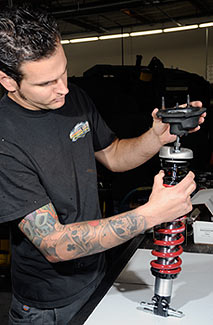
To
assemble the front coil-overs, Eric Norrdin began by
installing a QA1 Torrington bearing on each front
shock's adjuster ring followed by an Eibach 600-lb/in
spring, a spacer and a low-rate Eibach "helper" spring
which keeps the main spring on its seat when the
suspension is at or near full rebound. Next, to go on
was a QA1 compression stop (PN BC01) which may be needed
in some street application because QA1s for coil-over
applications do not have stops. The BC01, must be cut to
fit. The top three sections are removed and what's left
is installed in the shock.
|
 |
|
Assembling a true coilover is much easier than
doing the stock shock/spring combos because neither
specific "clocking" of the parts, discussed in the
Factory Service Manual, nor spring compressors are
required. Image: CHpg Staff.
|
|
 |
|
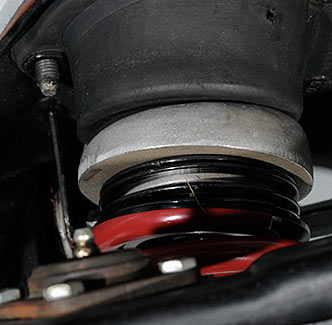
A key part of the front coilovers is Global
West's spring seat adapters–the
cast aluminum piece between the helper spring and the
stock upper mount–which
ensure the durability of the costly upper spring mounts.
Image: CHpg Staff. |
|
 |
|
Installing the Eibach/QA1 coil overs is a little
easier because they are slightly less in diameter and
are lighter.
Image: CHpg Staff. |
|
Eric
then added Global West Spring Seat Adapters, a key part
of the front shock build-up as it vastly improves the
durability of the front shock mounts. The design of 4th
Gen F-car front upper spring mount has the majority of
suspension load applied by the spring to the rubber
upper mount through a spring seat molded into the mount.
Only damping loads are applied to the upper shock mount
which is concentric with the spring seat. Some
aftermarket coil-over conversions for 4-gen Camaros
apply all load through the upper shock mount. They do
this because it simplifies the design and reduces cost,
however, concentrating all the load on the smaller shock
mount, causes the upper mount to wear rapidly–not
good when you consider upper mounts are over $200 each.
Global West's spring seat adapter is a cast aluminum
piece which goes between the Eibach spring and the stock
spring mount and insures suspension loads are applied to
the upper mount in the way GM intended and that
preserves the part’s
durability.
|
 |
|
Our road-ready, front suspension and brakes.
Image: CHpg Staff.
|
After assembling the Global West front coil-overs, Eric
set our baseline spring height adjustment at six-inches
from the bottom of the threads on the shock body to the
spring adjuster ring then put them on the car.
|
 |
|
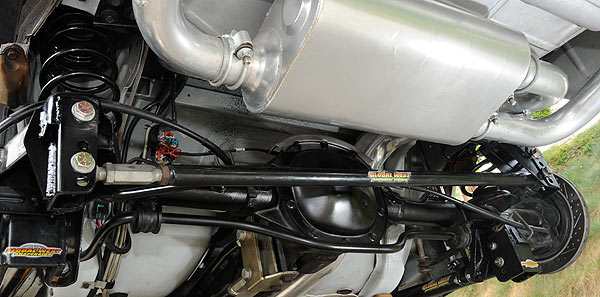
The revised THRS rear suspension showing the
Global West Track Bar Upgrade.
Image: CHpg Staff. |
|
 |
|
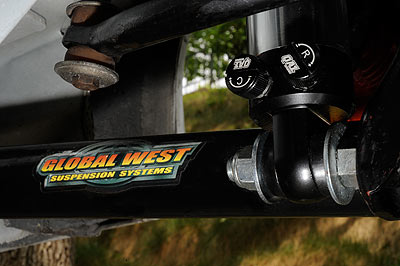
If you have to adjust the rear shocks, this is
what you see once you've got the car safely in the air.
Simply turn the knobs to change damping authority. The
knobs turn valves which have strong detents, so there's
no confusion about how many clicks you've turned. Image:
CHpg Staff. |
With
the Track Bar upgraded and the new springs and shocks in
place, Eric Norrdin began the final chassis modification
for this part of the THRS series: installing a set of
Global West Subframe Connectors (PN 905). The purpose of
adding subframe connectors to a unit-body car is to
increase the strength of its underbody structure which
can flex in two ways. It can bend longitudinally or it
can twist. When the aftermarket invented subframe
connector (SFC) kits, it was drag racers who lead the
way and many of the cars for which connectors were
designed had the main subframe rails inboard from
channel sections which underlie the car's rocker panels.
Consequently, some subframe kits link the inboard rails.
That makes an improvement to the car's stiffness in
bending–which
is great for drag racing–but
not so much to stiffness in torsion because the greatest
torsional deflection comes at the outer parts of the
structure.
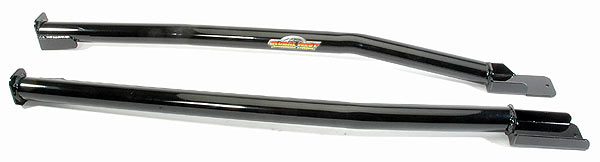 |
|
Global West's Subframe Connector kit for 4th Gen
F-cars. Image: Global West Suspension.
|
Other makers of subframe connectors for 4th Gen Camaros,
Global West included, tuck them into the cavity between
the rocker panel and the pinch weld which runs the
length of the car between the wheels. Such an
installation stiffens the car both in bending and
torsion and stiffness in torsion is important to a car's
limit handing, especially when the car is modified for
increased lateral grip and additional roll stiffness.
 |
|
The Subframe Connectors are not a bolt-on part.
They must be welded onto the car by an experienced
fabricator.
Image: CHpg Staff. |
A
proper subframe connector installation cannot be done
with bolts. Global West's SFCs must be welded in place.
One final aspect of subframe connector installations is
an issue enthusiasts usually don’t
consider. The connectors we installed are made from
0.125-in wall thickness, drawn-over-mandrel (DOM), 1020
mild steel tubing. That extra structure under the doors
is a significant enhancement to the car's side-impact
crashworthiness.
 |
|
After all the work at
Global West, it was time for the crowing
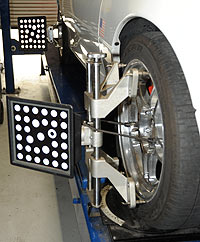
touch, suspension alignment. Global uses
a Hofmann, optical-sensing alignment
system. "Targets" are attached to each
wheel and light sensing devices measure
alignment using the white dots on each
target board. Seems a little "wizbang" at first, but the system
is dead nuts accurate. Image: CHpg Staff. |
|
 |
|
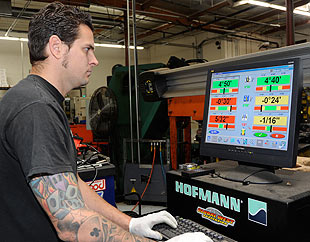
Eric Norrdin at the controls of the Hofmann rig.
The unit's computer displays caster, camber and toe
information. Image: CHpg Staff.
|
The
final task at Global West work was to 1) verify the ride
height–Eric's
initial adjustment was spot on–then,
2) do a front end alignment to our specs which are: -0.5°
camber, 4.5°
caster and 3/32-in toe in. |
 |
|
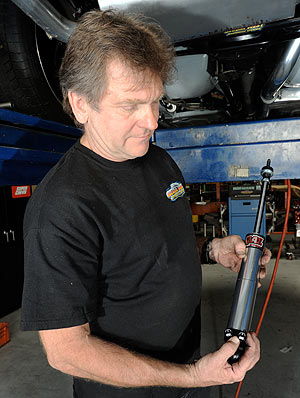
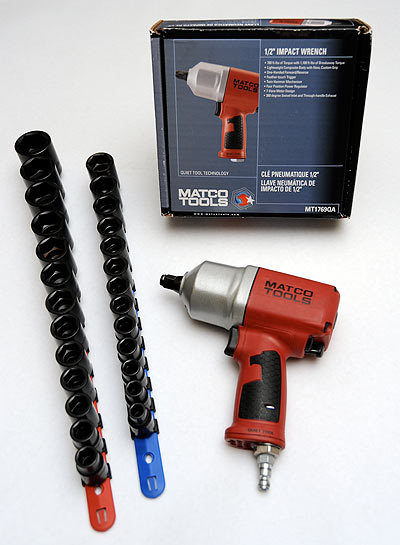
Another tool we used a lot since we got it last
year is this Matco impact gun or, more properly the
"1/2-in Quiet Air Impact Wrench" (PN MT1769QA). We like
this tool because it's much quieter to use than the air
impact we had before. The grip and the back half of the
Matco are composite plastic and the hammer case and all
reciprocating or rotating parts are metal. The Matco
weighs 4.1-pounds, about six and half ounces less than
impact we had in the shop before. Almost half pound
makes quite a difference in the feel and handing of the
tool. The MT1769QA is one of the most powerful 1/2-drive
impacts Matco makes and are among the most powerful in
the industry. Its nominal torque range is 50-650 ft/lbs
and maximum rated torque is 780 ft/lbs. To go with our
new impact, we ordered two sets of Matco's nearly
indestructible impact sockets, metric and SAE. Image:
CHpg Staff. |
Click for Page 3
->
|